نحوه و سبک


Ever wanted to start brewing KOMBUCHA? In this video we walk you through the steps to get started. The first thing you need is a SKOBY. You can make your own from scratch and it is so easy!!!
Subscribe to OFF GRID with DOUG & STACY: http://bit.ly/2nrYf24
HERE ARE THE T SHIRTS ~ https://shop.bonfire.com/offgrid/
and as always THANKS FOR WATCHING AND SHARING our videos =)
*******************************************************************
SUPPORT US WHILE YOU SHOP:
Want to support us for FREE shop from this link (we get a % of the sale) : https://www.amazon.com/shop/influencer-f6690c8d
^ ^ ^ ^ ^
in this link you will find ~
BOOKS WE RECOMMEND, BECAUSE KNOWLEDGE IS POWER, RIGHT?
Appliances some OFF GRID and some ON GRID
personal care items
salt we use and other stuff you will find useful =)
~~~~STUFF WE USE AROUND THE HOMESTEAD ~~~~
CLYDES GARDEN PLANNER ~https://www.clydesvegetableplantingchart.com/ COUPON CODE "OFF GRID"
MASON TOPS FERMENTING KIT ----------------SPECIAL DEAL!!
http://www.masontops.com/offgrid
ALL AMERICAN SUN OVEN ----------------SPECIAL DEAL!!
https://www.sunoven.com/dougstacy-cou...
LOG OX https://www.thelogox.com/ COUPON CODE "OFFGRID"
SWISHER LOG SPLITTERS https://www.swisherinc.com/log-splitters.html COUPON CODE "OFFGRID"
*REMEMBER ~ IF YOU USE A LINK THAT HAS A COUPON CODE MAKE SURE TO USE IT FOR YOUR PURCHASE
WE ONLY GET CREDIT IF YOU USE THE LINKS ABOVE AND WE THANK YOU IN ADVANCE FOR SUPPORTING OUR WORK =)
** REMEMBER THE LINKS ABOVE COST YOU NO ADDITIONAL MONEY TO SUPPORT THE CHANNEL AND SOME OF THE LINKS ACTUALLY SAVE YOU MONEY =)
*******************************************************************
*********LET'S GET SOCIAL*********
Follow Doug & Stacy:
Facebook: https://facebook.com/OFF-GRID-....with-DOUG-and-STACY-
Instagram: https://instagram.com/offgridwithdougandstacy/
Twitter: https://twitter.com/2_off_the_grid
Join our Facebook group "Homestead Homies" :
https://facebook.com/groups/1670530899907249/
Watch more OFF GRID with DOUG & STACY:
Recent Uploads: https://www.youtube.com/playli....st?list=PLylxeR881sU
Popular Videos: https://www.youtube.com/playli....st?list=PLylxeR881sU
Foraging and Fermenting: https://www.youtube.com/playli....st?list=PLylxeR881sU
Off Grid Homestead Remedies: https://www.youtube.com/playli....st?list=PLylxeR881sU
Email: growinginfaithfarm@gmail.com
Send snail mail to:
DOUG AND STACY
PO box 141
Bowling Green, MO 63334
About OFF GRID with DOUG and STACY:
We moved to our 11 acres in 2011 from a large city in the Midwest with zero carpentry and farming skills. We live with no solar / wind power / public water or well. We share our adventure to a sustainable life, growing our own food from vegetables to meat. We post videos DAILY and they range from HOW TO to EVERYDAY LIFE and NUTRITION on the off grid homestead. We were city folks just like you probably and wanted to enjoy life and have more control over our food. We share food recipes as well as natural remedies.

Milling flour is insanely easy and super fun in my opinion. All you need is a little primer to get started and your off to the races! Plus you can grind any grain that you want. Plus whole wheat berries last an extremely long time at room temperature so you don't have to worry about it getting old like already ground flour.
Recipe: https://www.joshuaweissman.com/post/homemade-flour
My Current Flour Mill: https://shop-links.co/1736292378216027498
Another Flour Mill I plan on getting: https://shop-links.co/1736292966786613123
The MockMill: https://shop-links.co/1736292994504579569
My Thermometer: https://shop-links.co/1736293029315903739
My favorite grains and their sources:
Einkorn Wheat Berries: https://shop-links.co/1736293057740912659
Hard Red Spring Wheat Berries: https://shop-links.co/1736293079597421504
FOLLOW ME:
Instagram: https://www.instagram.com/joshuaweissman
Facebook: https://www.facebook.com/thejoshuaweissman
Twitter: https://twitter.com/therealweissman
Website: http://joshuaweissman.com/
---------------------------------------------------------------
Music - Saib: https://soundcloud.com/saib_eats
---------------------------------------------------------------

🥖Make Your Own Bread at Home in 10 Minutes | Easy Step-by-Step Guide 🍞
Craving fresh, homemade bread but short on time? Learn how to make delicious bread in just 10 minutes with our easy step-by-step guide! This video will show you how to mix, knead, and bake your way to perfect homemade bread with minimal effort. Whether you're a baking beginner or just looking for a quick bread recipe, this tutorial makes it simple and satisfying to enjoy warm, fresh bread right from your own oven.
🔔 Don’t forget to like, subscribe, and hit the bell for more quick and easy recipes!
#HomemadeBread #QuickBreadRecipe #BakingAtHome #StepByStep
YOUTUBE CHANNEL
www.youtube.com/@LifeInFullFlavorChef
▶️ MIDDLE EAST
https://www.youtube.com/playli....st?list=PLRrnC21hqTr
▶️ COOKING CLASS
https://www.youtube.com/playli....st?list=PLRrnC21hqTr
▶️ RESTAURANT REVIEW
https://www.youtube.com/playli....st?list=PLRrnC21hqTr
▶️ TRAVEL PHILIPPINES
https://www.youtube.com/playli....st?list=PLRrnC21hqTr
=========================================================
#foodtravel #cookingchannel #food #travel #youtubeshorts #moutable #cookingchannel #cooking #mezze #yallahabibi #arabicrecipe #yallah #cookingvideo #foodporn #mezze #foodfestival #foodtravel #foodvlog #foodphotography #foodie #foodlover #foodblogger #traveluae #youtuberecipes #youtuberecipevideo #cheflife #alexa #amazonalexa #delicious #foodstagram #youtube #foodphotography #foodblogger #cooking #chef #youtuber #goodfood #homecooking #cook #catering #nomnomnom #yummyfood #recipes #goodeats #igfood #culinary #youtubechannel
==============================================
👉 Subscribe to our channel. And press the bell🔔 icon.
SOCIAL:
 / life.in.full.flavor
 / lifeinfullflavor
CHAPTERS
00:00 Introduction
00:13 Ingredients
00:21 Tips: Bad Boy
00:29 Timing
00:43 See result
00:45 Step 1
01:41 Rest
01:56 Step2
02:18 Step3
03:03 Step 4
03:17 Done
03:26 THE END
———————-
RECIPE:
800gr Flour 00
10gr. Dry yeast
30gr. Salt
500gr water
STEP1
Mix yeast with 100gr of lukewarm water
STEP 2
Mix yeast and flour
STEP3
Add rest of the water
Salt 30 gr and combine
Rest 1 hour
STEP 4
Open and food the dough for consistency 3 time
Rest 30 minutes
Preheat oven at 250 with the cast iron pot Inside for 20/30 minutes
Step 5
Put some flour in the bottom of hot pot
Place the dough
Bake 30 minutes lid on
Step 5
Remove lid and bake extra 15/20 minutes
Enjoy

Black Tea: https://www.adagio.com/black/irish_breakfast.html
Green Tea: https://www.adagio.com/green/silver_sprout.html
Peppermint: https://www.adagio.com/herbal/peppermint.html
Hibiscus: https://www.adagio.com/spices/hibiscus.html
Licorice root: https://www.amazon.com/Chopped....-Licorice-4oz-Ideal-
Chamomile: https://www.adagio.com/herbal/chamomile.html
Tea Ball: https://www.amazon.com/Fu-Stor....e-Stainless-Strainer
Our Blog: http://beyondthebag.net/
Our Instagram: @beyond.the.bag
As promised today we are kicking off a new series on how to make your own tea blend. We will be looking at a set of 10 base ingredients that we will use in a series of tea blends that you can follow along with at home as well as provide a launching spot for you to go and make your own tea blend.
So, the first 2 ingredients we are going to be using are black and green tea loose leaf.
Black tea is the most common kind of tea and also the darkest. It carries a bold hearty flavor and notably has the most caffeine of any tea type. Teas like Earl Grey and Chai are all built on a base of black tea. An English or Irish breakfast will work beautifully. The specific variety doesn’t matter too much especially since any subtle differences will likely be hidden once we blend other spices with it.
Despite coming from the same plant as black tea, green tea couldn’t be more different. It has a distinctive green color and a more grassy flavor. It works really well with fruit and floral flavors. While it doesn’t have the same levels of caffeine as black tea, it still has a bit just to perk things up.
Next, we move on to herbal teas. Another tea regular you might be familiar with we will make use of dried peppermint leaves or as they are more commonly known peppermint tea. They have great calming effects and are great for the stomach. It also has a great taste that can add a nice touch to a blend.
Hibiscus petals are our next addition. They have an intense deep red color paired with a strong sour fruity floral taste that is wonderful! It also helps to lower both blood pressure and blood sugar which is quite handy. It can be a bit hard to find outside of specialty tea stores so I’ll leave a link down below to where you can find it online.
Next, Licorice root. It has a nice flavor that hangs around on your pallet. It is incredible for sore throats! Being someone who deals with allergies, I have tried many different methods for dealing with an angry throat and Licorice tea is the best I have found for fast acting relief. You can feel it working while drinking it! It is not commonly found except in specialty stores or health food stores, so I’ll leave a link in the description to where you can find it online.
Finally, our last herbal tea is Chamomile. It's great for relieving stress, promoting calm, and aiding sleep. It serves as a great base when green or black tea’s caffeine isn’t desirable such as before bed.
Any list of blending ingredients would be incomplete without ginger. This superstar spice has it all. The unbeatable flavor and a very long list of health benefits that make it useful for a wide range of ailments including but not limited to congestion, upset stomach, and even joint pain! We will be using just the plain powdered variant available in the spice aisle of any supermarket.
Next up we have cinnamon. It packs a punch in both flavor and health benefits including lowering blood sugar levels and helping reduce the risk of heart disease. We will be using the regular powdered version of this one too.
We go on to another potent spice with Turmeric, the spice that gives curry it's coloring. It has been used for thousands of years in India for its numerous and potent health benefits especially for the immune system and digestive tract. It also carries a very bright and concentrated yellow color. The powder can stain skin and clothes so a bit of caution is advised.
Cardamom will be the final ingredient on the list. It is the spice that gives chai most of its yummy holiday type flavor. It has a very unique anti-cavity property and helps prevent fat build up around the liver. Both pods and powder are used in tea, we will be using the latter.
So, using these 10 ingredients we will go through a series of blends and tea-based beverages that you can follow along with at home and hopefully create some of your own!
In addition to the ingredients, we will also be using a tea ball, mug, and teapot.

You can make your own yogurt using only 2 ingredients so that you do not have to buy yogurt from the store. It is cheaper to make your own yogurt than buying yogurt from the store. To start, you need milk and couple of tablespoons of existing yogurt, this yogurt sample contains the culture to make the yogurt. Culture is simply a bacteria that converts lactose in yogurt to lactic acid making milk into yogurt.
Boil the milk to sterilize the milk, make sure the milk does not boil over. Let the milk cool down to luke-warm temperature. Add couple of tablespoons of yogurt and milk to the container of your choice and place the container in oven or an area that retains heat. Do not turn on the oven, the oven is only to retain the heat. After 6 hours, yogurt is set.
#Yogurt #Gardening #DaisyCreekFarms
Daisy Creek Animals Channel
https://www.youtube.com/channe....l/UC6EgPcrA0AwoEoVtr
____________________
UPICK AND VISIT THE FARM
If you are in California and would like to Visit the Farm for UPick
Email me at info@daisycreekfarms.com
Visit our Website at https://www.DaisyCreekFarms.com
____________________
EMAIL NOTIFICATIONS
We are scheduling Harvest Events such as Sugarcane, Potatoes, Pumpkins etc.
We will also have Gardening Classes regarding Growing Produce and Making Compost etc.
We are also Shipping Fruit Boxes within Continental United States
Signup for Local and Non Local Email Notifications
Local: What's Available for Upick, Produce and Veggie Box Pickup and Delivery, Events, and Classes
Non Local: Events, Classes, Stay at Farm BnB, Fruit Box Availability for Shipment
SignUp Here: https://www.daisycreekfarms.com/email-subscription
____________________
SOCIAL MEDIA LINKS
YouTube: https://www.youtube.com/c/DaisyCreekFarms
Like Facebook Page: https://www.facebook.com/DaisyCreekFarms
Join Facebook Group: https://www.facebook.com/groups/218063869133378
Instagram: https://www.instagram.com/DaisyCreekFarms
Twitter: https://twitter.com/daisycreekfarms
Pinterest: https://www.pinterest.com/DaisyCreekFarms
____________________
PRODUCT REVIEWS
Send an email to info (at) DaisyCreekFarms.com to obtain address for sending the products. I make educational videos for my viewers and will not be able to center my video on a product. If I like your product, I will include it in one of my videos and mention your product.
___________________
CONTRIBUTIONS
Patreon https://www.patreon.com/jagsingh
Love these videos? You can support our effort with a small contribution through Patreon.
___________________
MORE VIDEOS
Stop Buying Butter, Make Your Own
https://www.youtube.com/watch?v=BdEruPN-AdM
14 Store Bought Vegetables you can Regrow
https://youtu.be/ZJuXpiEjdcc
Top 5 Microgreens You Must Grow
https://youtu.be/nZWzuJ0L63o
Top 5 Sprouts You Must Grow
https://youtu.be/2sMvtFgy2Gs
6 Herbs You Can Grow From Cutting
https://youtu.be/PPjYr8uX5Bs
10 Herbs You Can Grow Indoors
https://youtu.be/DeLjnFTDjFc

How to make your own concrete pavers like a pro
DIY Paver Patio Installation
In this video, you can see how I make DIY pavers for my patio. And how I saved a lot of money by making DIY pavers.
Just so you know, I'm making DIY pavers for the first time.
- The first step was to make a wooden mold
- The second step is measuring and leveling the terrain
- And the third step is mixing the cement with sand and filling the mold, and then repeat this many times.
I found that the best mix of cement, concrete, and sand is 3 parts sand to one part cement. Water by feeling.
You will see how to lay pavers on the ground of the yard.
Related video:
https://youtu.be/CRvSj8Av4do
https://youtu.be/rvMpGdIMcEs
https://youtu.be/FvSdBHAl5hc
And so I make a patio in front of my mobile tiny house build.
To finish this tiny mobile home I need about two more months. And then we have to find another tiny mobile home project.
Stay tuned for more tiny home builds!
You can support the channel here:
https://paypal.me/robertklemen....sberger?locale.x=en_
Thanks for watching and see you in the next video!
Uploaded to this channel are not how-to videos.
All work is done in a personal and self-responsible manner.

One of the biggest challenges when making clothes for yourself is to get the fit and sizing correct. A good solution is to use a mannequin based on your own body measurements. Find out more in this blog - https://www.fashiondesignacade....my.co.uk/blog/create
The British Academy of Fashion Design Academy provides accredited, industry recognised fashion design qualifications in the UK. Whether you want to learn the basics of fashion design, launch a career or start your own business we have the right course for you.
https://www.fashiondesignacademy.co.uk/courses.php

⭐⭐ Easily make cigarettes. I've never been into roll ups, ever. Too fiddly and not a good smoke. However, I had some old packaging tobacco that it is now illegal to sell in my shops after the UK anti smoker legislation, so I thought I'd give this technique of homemade cigarettes a go.
Very easy to do, very cost effective. You get a proper cigarette for not very much effort!
#cigarette #cigaretterolling #cigarettemachine
Amazon Link: Cigarette Maker➡️ https://geni.us/Bd5wG
Amazon Link: Cigarette Tube➡️ https://geni.us/CQaw
Want free Amazon Delivery, video, music and more? Try AMAZON PRIME Click the link below:👉
➡️ http://geni.us/TryPrimeforFree
Welcome to my YouTube channel dedicated to providing honest and insightful product reviews!
At Clough Reviews, I'm passionate about exploring and sharing our experiences with a wide range of products. Whether you're searching for the latest gadgets, household appliances, DIY products, or any other consumer goods, you've come to the right place. I strive to be your go-to source for informative and trustworthy reviews that help you make informed purchasing decisions.
📣 Please tell us, what do you think of this video?
===================================================
👉 Subscribe to our channel and press the bell 🔔 icon. Turn on notifications to never miss an upload! 🔔
===================================================
⏰ Video Duration: 00:02:14
===================================================
⌚ SCHEDULE:
⌚ New Videos Every Week ⌚
👉 Don't forget to share your opinion in the comments below.
Thank you for supporting the “ Clough Reviews ” YouTube channel.
===================================================
📲CONNECT WITH US ON SOCIAL MEDIA:
Twitter ➡️ https://twitter.com/CloughsStuff
Facebook ➡️ https://www.facebook.com/cloughsstuff
===================================================
📺 Watch my previous videos 📺
🎬 Installing a Basin Waste in 5 minutes:
https://youtu.be/JtWIvHEgPeI
🎬 BU-KO – 3 in 1 Multi-Tool Review:
https://youtu.be/AqyXWrl6WEY
🎬 The Grand Hyatt Rio de Janeiro Review:
https://youtu.be/cgwC1_bqZ20
🎬 HORL 2 Pro, Best and Easiest to Use Knife Sharpener, Ever!!:
https://youtu.be/4TrmyBKTCQE
🎬 Best MagSafe Case for Samsung S23 Ultra?:
https://youtu.be/km5qMmG0RYU
🎬 Banyan Tree, Spa Pool Villa Luxury, Phuket, Thailand:
https://youtu.be/ucasYR09IUE
🎬 Zeavola Resort Review, Koh Phi Phi Island, Thailand:
https://youtu.be/FGJv58_uEOU
🎬 Combination lock Key Safe with Removable Shackle:
https://youtu.be/kVof089QI6Q
🎬 SONY WH-1000XM5 Awful Name, Great ANC:
https://youtu.be/CtC0t2B1Svg
🎬 Sofitel Krabi Golf & Spa Resort Review:
https://youtu.be/YJmLLVvxoSE
🎬 Philips OneBlade Shaver Review:
https://youtu.be/dc-cI4nm35U
🎬 Koh Samui, Thailand, InterContinental Luxury:
https://youtu.be/aIrNI_lp1IA
🎬 The Landmark Hotel Bangkok Quick Review:
https://youtu.be/z1RikjziVIA
🎬 Can Crusher Installation and Review:
https://youtu.be/qBoiC7-Xz2Q
🎬 Infrared Thermometer Non-contact Review:
https://youtu.be/yiG7wPOZCII
🎬 Synology DS120j NAS. Removing and installing a My Home Cloud Hard Drive:
https://youtu.be/bxkekY9Syjc
🎬 Galaxy Z Fold 3, Z Fold 4 Case with Tempered Glass Cover:
https://youtu.be/61I_sb33Hq0
===================================================
❣ SPONSORED ❣
No, this video was not sponsored.
===================================================
📧 For Business Inquiries 📧
📨 Email: cloughs_stuff@btinternet.com
📚 For more information click here: https://www.cloughsstuff.com/blog
⚠️ "DISCLAIMER” ⚠️
The information provided on this channel is believed to be accurate and reliable at the time of publication, but we make no representations or warranties of any kind, express or implied, about the completeness, accuracy, reliability, suitability, or availability with respect to the information, products, services, or related graphics contained on the channel for any purpose. If any owners would like me to remove the video, I have no problem with that, just send me a letter: cloughs_stuff@btinternet.com
#cigarettemakerroller #cigarettemakerkit #cigarettemakertool

Today, YouTuber and influencer, Jessalyn Grace, teaches you how to create your very own personalized stickers from home!!
#LiveJustice
#RunTheWorld
#JessalynsCreativeCorner
Check out the music video for "Rainbow" here: https://runtheworld.lnk.to/Rainbow/Yo...
Subscribe to Justice 💞: https://www.youtube.com/shopjustice
Follow Justice! 💞
Instagram: https://www.instagram.com/justice/
Facebook: https://www.facebook.com/Justice/
Check out the music video for "Rainbow" here: https://runtheworld.lnk.to/Rainbow/Yo...
Follow Run The World! 🌈
Facebook: https://www.facebook.com/OfficialRunT...
Instagram: https://www.instagram.com/officialrun...
Twitter: https://twitter.com/officialrtw
TikTok: https://www.tiktok.com/@officialrunth...
https://www.runtheworldofficial.com
#RunTheWorld #RTW #Rainbow
#JessalynGrace #HayleyLeBlanc #CorinneJoy #KherisRogers

I am building a simple wooden planter box for my oldest grandson who just turned six last Thursday. He is interested in growing vegetables and my wife asked me to build this box today. This planter was approximately 4 foot by 1 and a half foot and 16 inches tall. These are some of the tools that I used: https://amzn.to/2MCNn0b

(Sponsor): https://www.pulseway.com/ztt2020?rfid=ztt21
Thanks to Pulseway for sponsoring this video! Make sure to start your free, no-commitment trial through the link below and save 20% off: https://www.pulseway.com/ztt2020?rfid=ztt21
In today's video I’m showing you exactly how I built this ultra budget home server, and I’m also explaining to you why I think you should build one as well. I give multiple examples of things to do with a home server including building a NAS, setting up a home media/Plex server, and even how to experiement with Linux with a virtualization platform.
Parts List:
CPU: https://geni.us/hbn1
RAM: https://geni.us/1varH
Mobo: https://geni.us/RBTQ
GPU: https://ebay.us/V5ospf
PSU: https://geni.us/WQ9Jd
SSD: https://geni.us/Bq09W
HDD: https://geni.us/cpLq
Case: https://geni.us/WoEr
Fans: https://geni.us/Ti7K6p
Cooler: https://geni.us/J1ALGs
Buy PC Games At Discounted Prices Here:
https://www.greenmangaming.com/?tap_a=1964-996bbb&tap_s=1709645-09f4fb
━━━━━━━━━━
Support ZTT!
💰 YouTube Membership ➔ https://www.youtube.com/zachstechturf/join
👕 ZTT Merch ➔ https://teespring.com/stores/zachs-tech-turf
🎥 Production Gear ➔ https://bit.ly/zttgear
━━━━━━━━━━━━━
Follow ZTT!
🎙 TWITCH ➔ https://twitch.tv/zachstechturf
📱 DISCORD ➔ https://discord.gg/XHjqzXq
🐦 TWITTER ➔ https://twitter.com/zachstechturf
📷 INSTAGRAM ➔ https://www.instagram.com/zachstechturf/
(I upload my behind-the-scenes "VLOGS" every single day on Instagram Stories)
📧 EMAIL ➔ zachstechturf@gmail.com
Background Song: Slides - Damma Beatz
━━━━━━━━━━━━━
#HomeServer #HomeLab #SelfHosting

How To Build A Modern House In 10 Minutes!
👚 MERCH & TOYS 🡆 https://www.unspeakable.com/
🎮 PLAY CHASECRAFT 🡆 play.chasecraft.gg
🏬 CHASECRAFT STORE 🡆 https://store.chasecraft.gg
MORE YOUTUBE CHANNELS!
🡆 VLOGS 🡆 https://goo.gl/r296vR
🡆 UNSPEAKABLEPLAYS 🡆 https://goo.gl/bbfyv7
👍 FOLLOW ME!
INSTAGRAM 🡆 http://instagram.com/unspeakable
TIK TOK 🡆 https://vm.tiktok.com/tyG2Rd/
TWITTER 🡆 https://twitter.com/UnspeakableGame
Thanks for watching! Likes are greatly appreciated! Subscribe to be notified when my next video is live!

Here's how to build an affordable deck! Wood prices are high so building this way is cost effective so you can actually enjoy your backyard instead of just sitting in the dirt! For links to purchase the products in this video CLICK SHOW MORE ⬇⬇⬇⬇⬇⬇⬇⬇⬇
To clarify both my sons Matt and Nate are helping me build this deck, and of course Max is filming. It took us 3 hours to whip this together! I am sure anyone can do it in one day even if working alone. And you hardly need any tools at all. Cheers!
Shop Jeff’s favorite tools and great products and help support our next project!
► Shop Wayfair 🇨🇦: http://www.jdoqocy.com/click-9148559-14525657
► Shop Wayfair 🇺🇸: http://www.jdoqocy.com/click-9148559-14524913
► Shop Amazon 🇨🇦: https://geni.us/mlVE (Amazon)
► Shop Amazon 🇺🇸: https://www.amazon.com/shop/homerenovisiondiy
► Shop Home Depot: https://homedepot.sjv.io/nBVOX
► For discounts on flooring, paint, hardscapes, soundproofing and more visit our website:
https://homerenovisiondiy.com/our-affiliates/
*****Be sure to use the coupon codes before checkout
Did you know we launched a newsletter? Sign up here: https://homerenovisiondiy.com
🔨 SHOP TOOLS 🔨
Tape Measure - https://geni.us/TapeMeasure25FT
DeWALT Mitre Saw - https://geni.us/MiterSaw15Amp
Level - https://geni.us/BeamLevel72
DeWALT Circular Saw - https://geni.us/CircularSaw
DeWALT Sawzall - https://geni.us/ReciprocatingSawCorded
DeWALT Drill - https://geni.us/CordlessDrillComboKit
Makita Jig Saw - https://geni.us/TopHandleJigSaw
Oscillating Multi Tool - https://geni.us/ElectricMultiTool
#justdoityourself #lovingit #decks
Need Answers or Advice for your DIY Project?
BECOME A DIY MEMBER NOW!
Become a DIY Member by clicking the “join” button beside the “subscribe” button - https://www.youtube.com/c/Home....RenoVisionDIY/member
► Get FULL access to me and my team for Q and A’s in the DIY Crew Forum
► Participate in monthly LIVE streams for live consulting and Member support!
0:00 - Intro
0:08 - Surface Preparation
1:01 - The Structure
2:16 - Fasteners & Spacing
5:16 - Levelling & Squaring
9:46 - Decking
15:55 - Preserving The Deck Over Time
SUBSCRIBE TO OUR CHANNELS
► Subscribe NOW and hit the bell to get notified about new videos - https://www.youtube.com/homerenovisiondiy
► Subscribe NOW to our 2nd Channel Reality Renovision - https://www.youtube.com/realityrenovision
► Subscribe NOW to our 3rd Channel Home Renovision en Español - https://www.youtube.com/channe....l/UCArXV-OHDthGX64xz
Music in this video may be used from Epidemic Sound. Download free copyright songs here: http://bit.ly/epidemic_sound
WANT TO WATCH MORE DECK VIDEOS??
► How to Build ANY Deck from A to Z! - https://youtu.be/hFmPEx6-uMA
► DIY DECK Part 7 | Building Stairs - https://youtu.be/YHaVEN6ijxU
FOLLOW US ON SOCIAL MEDIA:
INSTAGRAM: https://www.instagram.com/homerenovis...
FACEBOOK: https://www.facebook.com/homerenovisi...
PINTEREST: https://www.pinterest.com/homerenovis...
TIKTOK: https://vm.tiktok.com/ZMeTfxwWd/
Produced by: Home Renovision DIY 2020
Video & Editing Services Provided by:
Subdivision Film LTD.
https://www.SubdivisionFilms.com
Disclaimer:
Videos produced by Home Renovision are provided for informational purposes only. All material provided within this website is for informational, educational, & entertainment purposes only. Some of these projects, materials, and techniques may not be appropriate for all ages or skill levels. The DIY instructions used here are used to simply breakdown projects to their simplest steps. Please use a clear mind and use all safety precautions while following the tutorials provided by this site. Home Renovision does not make any claims of the safety of the projects, techniques, or resources listed on this site and will not take responsibility of what you do with the information provided by this site. Viewers must be aware by doing projects on their homes they are doing it at their own risk and Home Renovision cannot be held liable if they cause any damage to their homes. With different codes around the world and constantly changing standards, regulations and rules, it is the sole responsibility of the viewer to educate themselves on their local requirements before undertaking any sort of project. That being said Home Renovision cannot claim liability with all applicable laws, rules, codes and regulations for a project. Be safe, have fun renovating and ALWAYS stay informed with your local building code. HomeRenoVisionDIY may earn an affiliate commission if you purchase something through recommended links. #commissionsearned
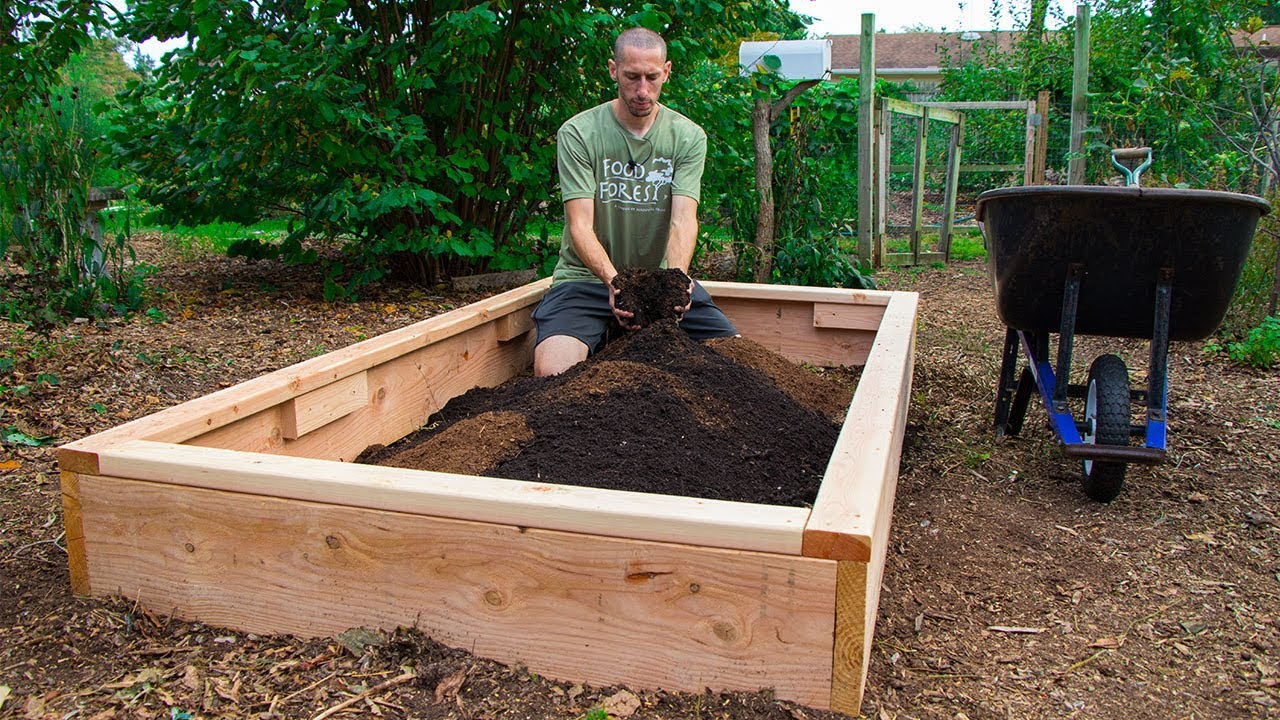
How to build a raised bed garden, anyone can do this!
Thanks for the kind words and support 😁🐕❤️
NEW Official Website! https://teamgrow.us
Amazon Store: www.amazon.com/shop/thegardeni....ngchannelwithjamespr
MY FAVORITE GARDEN PRODUCTS 🧰 💯
→Amazon affiliate link: https://amzn.to/2z7NIRQ
→ Sulfur Dust for Fungal Diseases: https://amzn.to/2VETaXP
→ UV Resistant Marker: https://amzn.to/3oUevXb
→ 40% Shade Cloth- https://amzn.to/3vrAYNF
→ Coco Coir: https://amzn.to/3uAyV9J
→ Vermiculite: https://amzn.to/311woeH
→Perlite: https://amzn.to/33uUJHQ
→Mykos Pure Mycorrhizal Inoculant: https://amzn.to/2WCZfRX
→6 Mil Greenhouse plastic: https://amzn.to/39m1YCQ
→Row Cover: https://amzn.to/2GR12h5
→Neem Oil: https://amzn.to/2NgXfta
→Insect Netting: https://amzn.to/2DbJ9I7
→BT Spray for Brassicas: https://amzn.to/3erdkss
→Pruners I use: https://amzn.to/2QsNCtT
→Tomato Clips: https://amzn.to/2YxoaGr
→Square Foot Gardening Book: https://amzn.to/3bUwCVo
→My Boots https://amzn.to/2NZq5Pe
ALSO FIND ME ON
→Facebook: https://www.facebook.com/JamesPrigioniGardening/
→Twitter: https://twitter.com/JamesPrigioni
→Instagram: https://www.instagram.com/jamesprigioni
→Contact: (Business Only) thefranchisse3@gmail.com


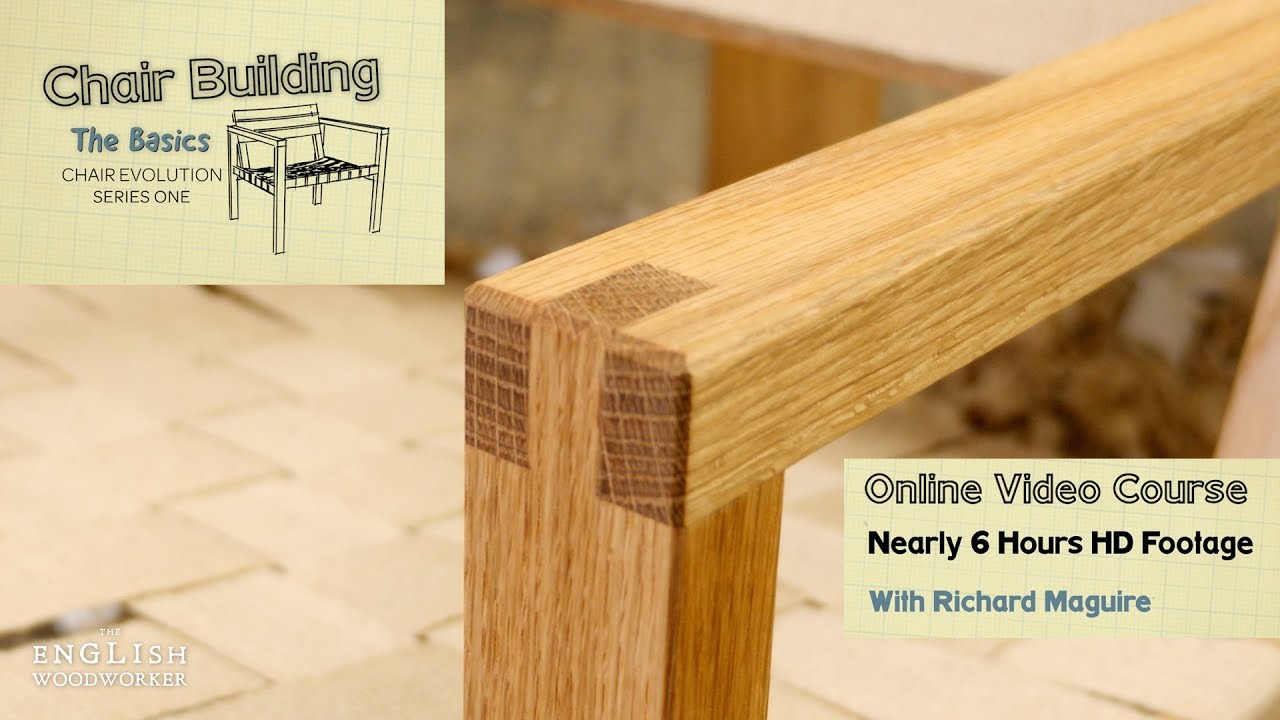
A quick look at the chair build from our latest series.
[Don't Miss the Introductory Discount on the Full Series. 25% off ends Friday 27th July]
In this online video course you'll learn to work wood efficiently by hand as you build your own chair. We teach practical hand tool woodworking giving precise and beautiful results with a swift pace of build.
The full series includes almost 6 hours of HD footage with in depth tuition including hand prepping your timber and cutting accurate bridle joints and mortice & tenons.
Unique to this series is an introduction to the design process which takes you through the journey of furniture design from concept to prototype and the final build.
For full details and to start watching today please visit our website: https://www.theenglishwoodwork....er.com/how-to-build-

How to build a two story deck with deck stairs and landing. DIY 2nd story deck home improvement. Luckily I purchased these materials last summer when prices were high but not as high as they are now in 2021.
~~ Help Support the channel by ordering plans or merchandise.
https://www.thirdcoastcraftsman.com/shop
"MY FAVORITE TOOLS" https://www.thirdcoastcraftsma....n.com/favorite-handt
"FOLLOW ME ON INSTAGRAM"
https://www.instagram.com/thirdcoastcraftsman
"MERCHANDISE"
https://www.thirdcoastcraftsman.com/shop
"MY WEBSITE"
https://www.thirdcoastcraftsman.com
"SUPPORT ME ON PATREON!!!" https://www.patreon.com/thirdcoastcraftsman
Facebook -- https://www.facebook.com/ThirdCoastCraftsman
Fine print: *Receive 20% off your purchase with promotion code THIRDCOAST. Excludes doorbusters, clearance products, poles and bullhorns, C-Lite tubes, NICOR® Limited Quantity items, LEVITON® controls, Cree Lighting® Noctura® Series, Cree Lighting® LXB Series and Cree Lighting® CPT Series. Offer valid upon receipt. This promotion code cannot be combined with any other non-loyalty offer and must be used at time of purchase. All returned items must be new and include their original packaging. Light poles and bullhorns are custom made and cannot be canceled or returned. Discontinued products cannot be returned.
DISCLAIMER: Woodworking and the use of power and hand tools can be extremely dangerous. You are responsible for understanding the safe use of your tools and techniques. Your safety is YOUR responsibility, I accept NO responsibility or liability for any injuries, accidents, death occurring to you or others if you attempt to do the things that I do or use advice that I give.

Have you always wanted a deck? They can add so much to your home - a place to entertain, a spot to relax - and elevate your property from average to amazing.
Here's everything you need to know to build the deck of your dreams - from how to plan, installing your frame and finally laying the decking.
For more information, head over to https://www.bunnings.com.au/di....y-advice/building-co

Ellie Sparkles is learning how to build a snowman while playing in her DIY Box Fort Game. Let's spin the wheel and see what kind of Winter Science Experiments her friends have for us!
Check out our website, and social media accounts!!💖✨:
Official Website: https://www.elliesparkles.com/
Facebook: https://www.facebook.com/EllieSparkle...
Instagram: https://www.instagram.com/elliesparkl...
💖✨
More from WildBrain
Official Website: https://www.wildbrain-spark.com/
Facebook: https://www.facebook.com/WildBrainSpark
Instagram: https://www.instagram.com/wildbrainkids/
Twitter: https://twitter.com/WildBrain_spark
#science #diyexperiments #snowman #diy #boxfort #ellie #elliesparkles
