Top Videos


Eagles Live Show with Josh Davis from the Philly Special Show looks at all of the Eagles draft and free agency news including the heated debate of Bijan Robinson or Jalen Carter at #10 for Philadelphia
Sub to JOSH’s Show:
https://www.youtube.com/@thephillyspecialshow
Support the show by becoming a MEMBER:
https://www.youtube.com/channe....l/UC8BsY-sNre9q3FtbC
Twitter: https://twitter.com/RealThomasMott
Facebook: https://www.facebook.com/profile.php?id=100090488612339&mibextid=LQQJ4d
Business inquiries email me: thomasmottshow@gmail.com
Credit For Articles Used:
PFN Mock Draft Simulator:
https://www.profootballnetwork.com/
FAIR USE ATTRIBUTION (Title 17 USC Section 107)
Any use of clips, articles from ESPN, FS1, the NFL and/or other YouTube channels in this video, were done so as criticism, comment, news reporting, and teaching and compliant with YouTube’s copyright guidelines and United States Federal Law:
#Eaglesnews #EaglesLive #EaglesLiveShow #JalenCarter #JalenCarterDraft #BijanRobinson #NFLDraft #EaglesDraft #NFLMockDraft #EaglesMockDraftTrades #EaglesDraftTrades #HowieRoseman #ThomasMott #JoshDavis

♫ George Ezra - Sweetest Human Being Alive
▪️ Discover similar songs on Spotify: https://sptfy.com/mrradio
▪️Stream/Download: https://spoti.fi/3iVY51Z
◼️Connect with us:
Spotify: https://bit.ly/SpotifyMrRadio
Instagram: https://instagram.com/mr_radioyt
Facebook: https://facebook.com/Mr.RadioYT
SoundCloud: https://soundcloud.com/mr_radioyt
Twitter: https://twitter.com/MrRGeorge Ezra - Sweetest Human Being AlivedioYT
Youtube: https://youtube.com/MrRadioStation
◼️ Connect with George Ezra:
Instagram: https://www.instagram.com/george_ezra
TikTok: https://www.tiktok.com/@george_ezra
Twitter: https://twitter.com/george_ezra
Facebook: https://www.facebook.com/georgeezramusic
Official website: https://www.georgeezra.com
◼️ Lyrics: George Ezra - Sweetest Human Being Alive
[Verse 1]
Somewhere out there is my girl
My future flame, my save the date
My come-to-bed-now for heaven's sakes
And I just cannot wait to meet my girl
[Chorus]
We'll dance by the light of the moon in the sky
We'll sail on through forever for a while
You'll tell your friends and I'll tell mine
Well, goodness gracious, what a time
I found the sweetest human being alive
[Post-Chorus]
Ooh-ooh
I can't wait to meet you, babe
Can't wait to love you, babe
Ooh-ooh
Can't wait to meet you, babe
Can't wait to love you, babe
[Verse 2]
Maybe wе already met once bеfore, oh-oh
Another time, late night
Same kids in a different life
And I just cannot wait to meet my girl
[Chorus]
We'll dance by the light of the moon in the sky
We'll sail on through forever for a while
You'll tell your friends and I'll tell mine
Well, goodness gracious, what a time
I found the sweetest human being alive
[Post-Chorus]
Ooh-ooh
I can't wait to meet you, babe
Can't wait to love you, babe
Ooh-ooh
I can't wait to meet you, babe
Can't wait to love you, babe
[Bridge]
When I meet you
Girl, I'll know you
I'll hold you and I'll be home
And I'll know I found the sweetest human being alive
[Chorus]
We'll dance by the light of the moon in the sky
We'll sail on through forever for a while
You'll tell your friends and I'll tell mine
Well, goodness gracious, what a time
I found the sweetest human being alive
[Post-Chorus]
Ooh-ooh
Can't wait to meet you, babe
Can't wait to love you, babe
Ooh-ooh
Can't wait to meet you, babe
Can't wait to love you, babe
[Outro]
When I meet you
Girl, I'll know you
I'll hold you and I'll be home
And I'll know I found the sweetest human being alive
#MrRadio #GeorgeEzra #SweetestHumanBeingAlive #Lyrics


![The Lord is My Shepherd' Psalm 23 [Great Encouragement] Carrol Roberson](https://i.ytimg.com/vi/vhAR4T1VV6w/maxresdefault.jpg)
WATCH PART 2 HERE: https://youtu.be/gm6tNK_iOHs
WATCH PART 3 HERE: https://youtu.be/w3ea4fKiS2g
In this SQL tutorial for beginners, you'll learn how to write basic SQL queries to ask for data from databases in just 15 minutes. To become a business intelligence analyst, you'll need to know this valuable skill! Here I'll teach you what is SQL.
What you learn over the course of these videos can be applied to MySQL, PostgreSQL, SQL Server and others.
☕️ WANT TO SAY A QUICK THANK YOU? Why not Buy Me A Coffee? Thanks for your support! https://www.buymeacoffee.com/adamfiner
🔵 LEARNSQL.COM
A comprehensive set of 56 hands-on online SQL courses for teams and individuals
https://geni.us/learnsql
🎓 SKILLSHARE - Get a 30-day free trial of Skillshare Premium!
https://geni.us/skillshare30day
✅ Navicat - Get 5% Off With This Link
https://geni.us/navicat_vb
📊 DATA HUBS FOR GOOGLE DATA STUDIO, EXCEL AND MORE:
Power My Analytics: https://geni.us/YLc9Re
Supermetrics: https://geni.us/5SNn
🔴 Don't forget to subscribe:
https://www.youtube.com/vitami....nbusinessintelligenc
00:00 Introduction
01:12 Why learn SQL for BI?
02:22 Tutorial start
03:43 SQL SELECT statement
05:07 AS field alias
05:32 WHERE clause
09:54 ORDER BY clause
10:54 INNER JOIN
13:08 Aliasing tables
14:00 GROUP BY clause
15:58 HAVING clause
16:49 Outro
🙏 SUPPORT THE CHANNEL 🙏
Paypal Donations - https://paypal.me/vitaminbi
**** 👀 RECOMMENDED WATCHING 👀 ****
- Business Intelligence For Beginners Playlist
https://www.youtube.com/playli....st?list=PLR0triVyTrB
**** 🎓 VITAMIN BI EDUCATION ONLINE COURSES 🎓 ****
LEARN BUSINESS INTELLIGENCE WITH DATA STUDIO
https://geni.us/datastudiocourse
**** 🛠 TOOLS AND SERVICES I RECOMMEND 🛠 ****
🧰 The tool I use to help me manage my channel, get video ideas, rank videos and more: https://vidiq.com?afmc=7ho
📹 Everything I use to make videos and stream:
https://geni.us/Z4zeqS
**** 📖 ⬇️ FREE EBOOKS TO DOWNLOAD ⬇️ 📖 ****
7 Steps to Landing Your First BI Analyst Job
https://geni.us/7stepstobi-ebook
7 Top Tips For Better Dashboard Design
https://geni.us/dashdes-ebook
The Skills You Need To Succeed In Business Intelligence
https://geni.us/biskills-ebook
📖 THE DATA VISUALISATION BIBLE 📖
https://amzn.to/3CKiPiV
🎥 MY YOUTUBE GEAR
My Camera - https://amzn.to/3J5lbeo
Most Used Lens - https://amzn.to/3hXoE2Q
B-Roll Lens - https://amzn.to/3pSUeDh
Main Tripod - https://amzn.to/3pSUeDh
Vlogging Tripod - https://amzn.to/3tOpJPZ
Main Key Light - https://amzn.to/366KaPI
Softbox - https://amzn.to/35HrR46
LED Panel Kit - https://amzn.to/35K3Lpf
Teleprompter - https://amzn.to/3hWGT8p
Main Microphone - https://amzn.to/3t1n1aK
Mic Boom Arm - https://amzn.to/3hUHzuX
Lavelier Microphone - https://amzn.to/3vVUi8V
C-Stands - https://amzn.to/3vZMoLN
Computer - https://amzn.to/3KB3RhU
Disclaimer: Some of these links go to one of my websites and some are affiliate links where I'll earn a small commission if you make a purchase at no additional cost to you. It really helps support the channel so thanks in advance if you do use them 🙏
✅ LET'S CONNECT:
For business inquiries visit https://www.learnbi.online/contact
Sign up for my mailing list to be the first to hear about new videos and special offers
https://geni.us/PSgRsF
Twitter - @learnbi_online
Facebook - @learnbionline
Get the database here - https://www.kaggle.com/hugomathien/soccer
mysql
#sqltutorial #sql #learnsql

This is an old tutorial. Please check out the newly updated video here!
https://www.youtube.com/watch?v=VOz-GXvfk9E
This video demonstrates how to import tables and databases in phpMyAdmin.
Related article: https://support.hostgator.com/....articles/cpanel/how-
Related Products:
Shared Hosting: http://gtr.bz/dYtg30q9PHF
Managed WordPress Hosting: http://gtr.bz/AFa030q9PJD
VPS Hosting: http://gtr.bz/qtpY30q9PJL
Dedicated Hosting: http://gtr.bz/MCj330q9PKk
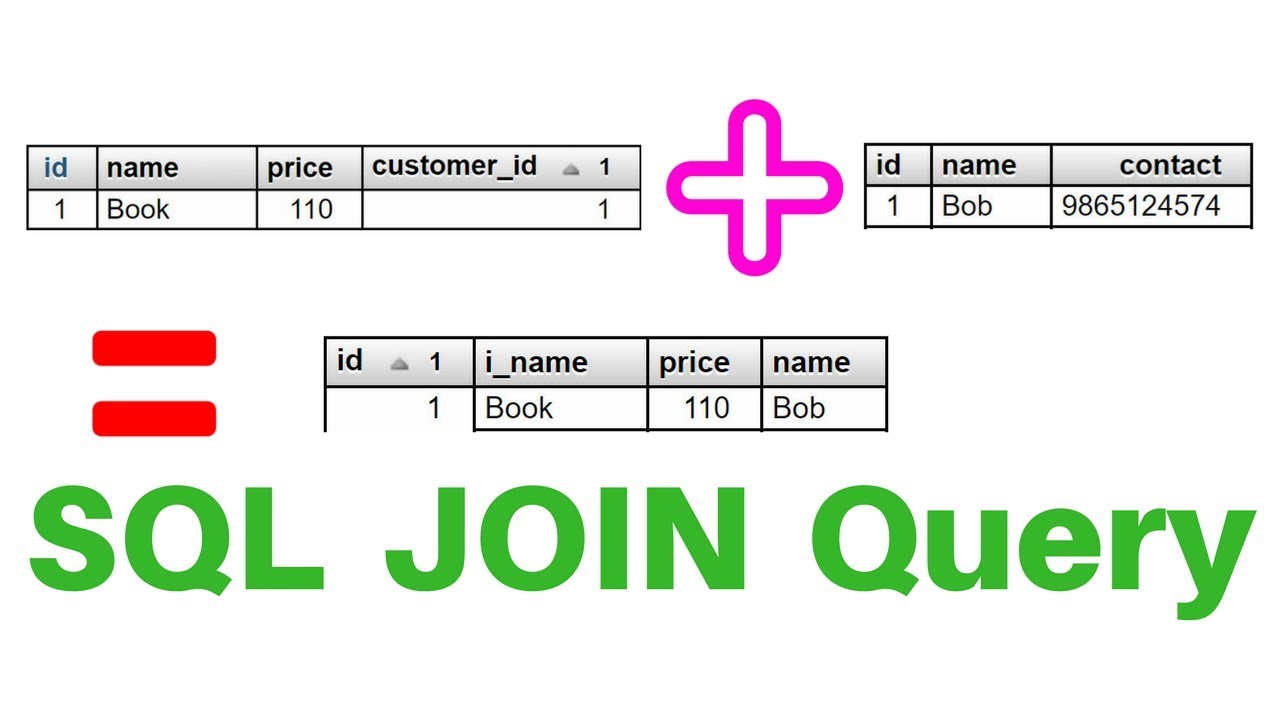
Do you want to join a different table of a database on MySQL with SQL Join query and also want to display that result in HTML table with the help of PHP? Then you will get all this stuff in this video.
How to Display Data from MySQL Database into HTML Table using PHP: https://youtu.be/bHFoobciCTM
How to connect HTML Form to MySQL Database with PHP in 4 Minutes: https://youtu.be/OHjkg_rifTw
HTML Table Tutorial For Beginners: https://youtu.be/LIjdXgfC5zM
Source Code: https://bit.ly/2zI7pQx
Twitter: https://twitter.com/CodeAndCoins
Google+ : https://goo.gl/7vjhrp
Blog: https://CodeAndCoins.blogspot.com
Share this Video and Subscribe to my channel


John Wick is a master of his weapons in every film. But how well do his firearms perform in real life? Today we test the guns from the film and see if they actually do well.
Patreon Signup - https://www.patreon.com/GarandTHumb
Onward Research http://onwardresearch.com/
SDI School: https://sdischool.co/Garand
Xidax Computers: https://tribelink.co/Xidax
Insta: https://www.instagram.com/garand_thumb/
GarandThumb on Facebook: https://www.facebook.com/garandthumb1


A mysterious circle of light over Houston has led some people to explore the theory of a UFO circling the skies - and even spying on NASA.
From Season 3 Episode 7.
🇬🇧 Catch full episodes of your favourite Quest shows on discovery+: https://bit.ly/3yWZURY
Subscribe to Quest TV for more great clips:
http://www.youtube.com/subscription_c...
Follow Quest on Twitter:
https://twitter.com/QuestTV


LET'S TALK ABOUT MY PRODUCT EMPTIES!! I've compiled my trash for the last year and wanted to talk about MY FAVORITE haircare, skincare, body and beauty products I've finished and LOVED!!
——————————————————————————
TRAIN WITH ME AND LIBDOG on the Alive App: https://aliveapp.co/
Free 7-day trial to see if it's a good fit for you 🖤
Instagram: @whitneyysimmons https://bit.ly/3lqcRfB
Tik Tok: @whitneyysimmons https://bit.ly/3rtCobs
SHOP Gymshark & SAVE 10% by using code: WHITNEY | ty ty ty! ♡
http://gym.sh/Shop-Whitney-Simmons
ALANI NU SUPPLEMENTS ♡
https://www.alaninu.com/whitney
or use code WHITNEY at checkout for free shipping over $50
AMAZON FAVORITES
https://www.amazon.com/shop/whitneysimmons
——————————————————————————
00:00 INTRO
00:44 MAKEUP EMPTIES
▫️ KVD Beauty Balm in 030
https://rstyle.me/+xhG4qZ4OjOTnhbijhG2Fbw
▫️ Refy Brow Gel
https://rstyle.me/+0RRuNAYQUweH1P8qxaNt8g
▫️ Glossier Brow Flick in brown
https://rstyle.me/+gh4GX1dTL2ApapdQZbEEFA
▫️ Bronzing Stick in Happy Sol
https://rstyle.me/+tqjuhaO2W3_OC6wBPQoMCw
▫️ Mascara
https://rstyle.me/+Lev7yERyGbLbUvZhmftq2Q
▫️ Lip Liner in Talented
https://rstyle.me/+Rb5Wgw3Jm0c2XsmFWV5-og
▫️ Pot Concealer in Custard
https://rstyle.me/+QvJXHGR9hDujav_iRI9fFA
▫️ Setting Spray
https://rstyle.me/+AkhmTC4Xb2Z4jhnjk9Sp4A
▫️ Bronzer in Radiant Bronze Light
https://rstyle.me/+b-nF2ULyo3jU-91FjiQ1Bw
▫️ Contour in Fair Medium
https://rstyle.me/+kai9gJLiWPmt1C3WbjZuzg
——————————————————————————
5:39 SKINCARE EMPTIES
▫️ Morning Face Wash
https://rstyle.me/+u0INQsr0KwBpL5rASwTEDg
▫️ Cleansing Balm
https://rstyle.me/+X09TI_PhgfS2vpKAkDC7rQ
▫️ Night Cleanser
https://rstyle.me/+nny8HupE2W2qcY2wmk6dIA
▫️ Oil Cleansing Balm
https://kravebeauty.com/products/makeup-rewined
▫️ Dieux Deliverence Serum
https://www.dieuxskin.com/products/deliverance
▫️ Great Barrier Relief
https://kravebeauty.com/produc....ts/great-barrier-rel
▫️ Snail Mucin
https://rstyle.me/+viUSDse_w6Sy6gpHyrScgg
▫️ Vitamin C
https://rstyle.me/+VMI5vqe50QXLmul8sOOrZQ
▫️ SUNSCREEN BBY
https://www.olivekollection.com/products/beauty-of-joseon-relief-sun-rice-probiotics-50ml?_pos=4&_sid=f53445920&_ss=r
▫️ Dieux Instant Angel
https://www.dieuxskin.com/products/instant-angel
▫️ Tinted Sunscreen
https://rstyle.me/+GBv9eKX45tGQBCrX0l-oJw
▫️ LIPPPIEE
https://rstyle.me/+24U725kqnkvdwPh7Tgz2lQ
——————————————————————————
12:57 HAIRCARE EMPTIES
▫️ Hair Mask
https://rstyle.me/+n3WgiPdM_cdG2z3LSFKeFw
▫️ Hair OIL
https://rstyle.me/+CaB-bYjBDKOqXle9MG0skQ
▫️ Dry Shampoo
https://rstyle.me/+FZ2faz968lukhXFEYB-y9A
▫️ Heat Protectant
https://rstyle.me/+mpcvnZjaaUOj1tT9gaWang
▫️ Olaplex Styling Cream
https://rstyle.me/+u_4qbzEfzu5-4R0eYYhMug
▫️ Olaplex Oil
https://rstyle.me/+b1XzkgWha4zIo7zrJJ03Zw
▫️ Hydrating Shampoo
https://rstyle.me/+hMXWuNi1LVinMC2WL8xMQA
▫️ Hydrating Conditioner
https://rstyle.me/+96EsFSBs_XHdguCulIIrIg
——————————————————————————
17:18 BODYCARE EMPTIES
▫️ Body Lotion
https://www.amazon.com/shop/whitneysimmons/list/2JNA17S78853T?ref_=cm_sw_r_cp_ud_aipsflist_aipsfwhitneysimmons_A832GBHNKVZTT331EKFG
▫️ Castor Oil
https://www.amazon.com/shop/whitneysimmons/list/2JNA17S78853T?ref_=cm_sw_r_cp_ud_aipsflist_aipsfwhitneysimmons_A832GBHNKVZTT331EKFG
▫️ Hand Wash
https://rstyle.me/+zF11fnODUnWSWBdjCw5CXQ
▫️ Body Wash
https://rstyle.me/+kueQt8E8BTfkMyPEHWuIxw
——————————————————————————
Editing provided by - https://www.ittostudios.com/
Gymshark, LTK and Alani Nu are affiliates links. Thank you for supporting myself, this channel and helping me continue to create content for you ♡

“In the Scriptures, the heart is considered the symbol of the entire person.”
Is your heart right with God? Hear Billy Graham explain in this 1989 sermon from Syracuse, New York. Watch more #MondayNightClassics every Monday at 8 p.m. EST.
CONNECT with the Billy Graham Evangelistic Association:
on Facebook: https://www.facebook.com/Billy....GrahamEvangelisticAs
on Instagram: https://www.instagram.com/BGEA
on Twitter: https://twitter.com/BGEA
on Pinterest: https://www.pinterest.com/bgea
on YouTube: https://www.youtube.com/billygraham
on TikTok: https://www.tiktok.com/@bgeaofficial
