- Film & Animation
- Music
- Pets & Animals
- Sports
- Travel & Events
- Gaming
- People & Blogs
- Comedy
- Entertainment
- News & Politics
- How-to & Style
- Non-profits & Activism
- Religion & Spiritual
- Health Natural Remedies
- Gardening +
- Arts & Crafts
- Action
- Hair & Beauty
- Hunting & Survival
- Shopping & Reviews
- Motivational & Self Help
- Jesus
- Marriage
- Live TV
- Programing & Coding
- Latest & Gadgets
- Make You Own
- Unexplained & Stange
- Jesus Christ
- Food & More
- Other
Latest videos


#latestnews #newsonline #newstoday #bdnews #news24x7tak #somoytvlive #somoytv
ভোরের সময় সংবাদ | ০৩ জুন ২০২৬ | Bangladesh Latest News | Somoy TV LIVE
Content Ownership:
================
SOMOY TV OFFICIAL LIVE STREAMING
COPYRIGHT : SOMOY MEDIA LIMITED
Details More: https://www.somoynews.tv
"SOMOY TV" is the Most Reliable News Source and Leading 24/7 News Based TV Channel in Bangladesh
Fair Use Disclaimer:
=================
This channel may use some copyrighted materials without specific authorization of the owner but contents used here falls under the “Fair Use” as described in The Copyright Act 2000 Law No. 28 of the year 2000 of Bangladesh under Chapter 6, Section 36 and Chapter 13 Section 72. According to that law allowance is made for "fair use" for purposes such as criticism, comment, news reporting, teaching, scholarship, and research. Fair use is a use permitted by copyright statute that might otherwise be infringing. Non-profit, educational or personal use tips the balance in favor of fair use.
"Copyright Disclaimer Under Section 107 of the Copyright Act 1976, allowance is made for -fair use- for purposes such as criticism, comment, news reporting, teaching, scholarship, and research. Fair use is a use permitted by copyright statute that might otherwise be infringing. Non-profit, educational or personal use tips the balance in favor of fair use."
About SOMOY TV:
===============
SOMOY TV is the Bangladesh Government Approved 24/7 News Based TV Channel and Most Reliable News Source and Leading 24/7 News Based TV Channel in Bangladesh, It also the Most Popular News Media for Bangladesh and Bengali Audience worldwide since 2011. And as well as "Somoy Digital" is also the Biggest Digital Media Platform operate by Somoy TV, Where all the news contents and program materials is producing by the own team or employees.
"Somoy TV" have the biggest Journalist and Content Producing team worldwide Where contents are related to current happening news of the country and abroad, Also we are producing the Special Content related to Technology, Entertainment, Life Style, Sports, Health, Education, Insurance, Loans, Mortgage, Attorney, Credit, Lawyer, Donate and donation, Degree, Hosting information, Claim related news, Trading news, Software, Recovery, Gas and oil, Electricity industry, Treatment, Attorney, Credit, Lawyer, Donate, Degree, Hosting etc.
Content Rights & Permission:
============================
Somoy TV has the sole rights of all contents and it does not give permission to any business entity or individual to use these contents except SOMOY TV (SOMOY Media Limited).
CONTENT DECLARATION
====================
Somoy TV has the sole rights of all contents and it does not give permission to any business entity or individual to use these contents except SOMOY TV (SOMOY Media Limited).
This Channel is the Based on News and Current Affairs. The uploaded all contents are Made by our own team. Also Sometimes We are using some Third-Party materials where we have the specific authorization and permission to use this on YouTube.
➤ 𝗞𝗲𝘆𝘄𝗼𝗿𝗱𝘀
Somoy TV | Somoy News | Somoy TV Live | Somoy News Today | Watch Somoy TV Online | সময় টিভি | সময় নিউজ | সময় টিভি লাইভ | বাংলা খবর | Breaking News Bangladesh | Latest Bangladesh News | Bangla Live News | Bangladesh News 24/7 | BD News | Live Breaking News | Bangladesh Headlines | Dhaka News | Politics News Bangladesh | Sports News Bangladesh | Entertainment News Bangladesh | Viral News Bangladesh | International News | সর্বশেষ খবর | আজকের খবর | ব্রেকিং নিউজ | সরাসরি সংবাদ | বাংলাদেশের সর্বশেষ খবর | রাজনৈতিক খবর | খেলার খবর | বিনোদন সংবাদ | ভাইরাল নিউজ | টাটকা খবর
Stay Connected with us:
====================
"SOMOY TV (Somoy Media Limited)" is the Leading 24/7 News Based TV Channel in Bangladesh.
Website: http://www.somoynews.tv
Google Plus: https://plus.google.com/+somoytvnetupdate
YouTube: http://www.youtube.com/somoytvnetupdate
Facebook: http://www.facebook.com/somoynews.tv
Twitter: http://www.twitter.com/somoytv
#00312210

A massive protest led by Mamata Banerjee shakes Kolkata as the Trinamool Congress faces post-election turmoil. With allegations of internal collapse, defections, and declining morale, Mamata hits the streets to project unity and strength. The rally—held amid controversy over police permissions—highlights the growing political tension in West Bengal.
#mamtabanerjee #tmc #westbengal #itwebvideos #kolkatanews #politics #protest #indianpolitics #elections #indiatoday #indiatodaynews
Subscribe to India Today for NEW VIDEOS EVERY DAY and make sure to enable Push Notifications so you'll never miss a new video.
All you need to do is PRESS THE BELL ICON next to the Subscribe button!
India Today TV is India's leading English News Channel. India Today YouTube channel offers latest news videos on Politics, Business, Cricket, Bollywood, Lifestyle, Auto, Technology, Travel, Entertainment and a lot more.
Stay tuned for latest updates and in-depth analysis of news from India and around the world!
WhatsApp Channel: https://whatsapp.com/channel/0....029Va2AnW3JENxxg7OuJ
Download App: https://indiatoday.link/wHaj
Follow us: Official website: https://www.indiatoday.in/
Twitter: https://twitter.com/IndiaToday
Facebook: https://www.facebook.com/IndiaToday

संजय सिंह से डरी योगी सरकार #dblive #breakingnews #shortsvideo #latestnews #news #congress #bjp
Please Subscribe
DB LIVE : https://www.youtube.com/@DBLive
DB LIVE Bihar-Jharkhand : https://www.youtube.com/@DBLiveBiharJharkhand
DB LIVE Maharashtra : https://www.youtube.com/@DBLiveMaharashtra
DB Live Haryana : https://www.youtube.com/@dbliveharyana
DB LIVE Jammu-Kashmir : https://www.youtube.com/@DBLIVEJk
DB LIVE Delhi : https://www.youtube.com/@DBLIVEDelhi
DB LIVE UP-UK : https://www.youtube.com/@DBLIVEupuk
___________________________________________________________________
Get paid membership : https://www.youtube.com/channe....l/UCBbpLKJLhIbDd_wX4
Like us on Facebook :https://www.facebook.com/dbliveofficial
Follow us on Twitter : https://twitter.com/dblive15
Follow us on Instagram : https://www.instagram.com/dblive.official/
Follow Us On WhatsApp : https://whatsapp.com/channel/0....029VaW4v2P0Vyc9Z4j6C
Visit DB Live website : http://www.dblive.co.in
Visit Deshbandhu website : http://www.deshbandhu.co.in/
DB Live Contact : dblive15@gmail.com

Today Breaking News LIVE | ഈ മണിക്കൂറിലെ പ്രധാന വാർത്ത | Top Headlines Of The Hour | 02-06-2026
#topheadlines #keralanews #todaynews #headlinesofthehour #news18kerala #malayalamnews #keralanews #newsinmalayalam #newslivemalayalam #malayalamnewslive #livenewsmalayalam #todaynews #latestnews #മലയാളംന്യൂസ്
About the Channel:
--------------------------------------------
News18 Kerala is the Malayalam language YouTube News Channel of Network18 which delivers News from within the nation and world-wide about politics, current affairs, breaking news, sports, health, education and much more. To get the latest news first, subscribe to this channel.
ന്യൂസ്18 കേരളം, നെറ്റ്വർക്ക് 18 വാർത്താ ശൃoഖലയുടെ മലയാളം യൂട്യൂബ് ചാനൽ ആണ്. ഈ ചാനൽ, രാഷ്ട്രീയം, സമകാലിക വൃത്താന്തം, ബ്രേക്കിംഗ് ന്യൂസ്, കായികം, ആരോഗ്യം, വിദ്യാഭ്യാസം, തുടങ്ങി ദേശീയ അന്തർദേശീയ വാർത്തകൾ കാണികളിലേക്ക് എത്തിക്കുന്നു. ഏറ്റവും പുതിയ വാർത്തകൾ ഏറ്റവും വേഗം ലഭ്യമാവാൻ ഈ ചാനൽ സബ്സ്ക്രൈബ് ചെയ്യൂ...
Subscribe our channel for latest news updates:
https://tinyurl.com/y2b33eow
Follow Us On:
-----------------------------
Facebook: https://www.facebook.com/news18Kerala/
Twitter: https://twitter.com/News18Kerala
Website: https://bit.ly/3iMbT9r
News18 Mobile App - https://onelink.to/desc-youtube

#NewsHeadlines
#EtvTeluguIndia
To watch your ETV all channel’s programmes any where any time Download ETV Win amp for both Android & IOS: https://f66tr.amp.goo.gl/amps
ETV Telugu(Youtube) - http://bit.ly/2QR0yu9
Facebook - http://bit.ly/2L2GYYh
ETV Jabardasth(Youtube) - http://bit.ly/35xdqtu
ETV Dhee(Youtube) - http://bit.ly/2Ok8zWF
ETV Plus India(Youtube) - http://bit.ly/2OlEAOg
Facebook - http://bit.ly/2DudC0t
ETV Abhiruchi(Youtube) - http://bit.ly/2OkEtTb
Facebook - http://bit.ly/2OSrIhv
ETV Life(Youtube) - http://bit.ly/2OiKAY6
Facebook - http://bit.ly/34tiqzk
ETV Telangana(Youtube) - http://bit.ly/33nRaAK
Facebook - http://bit.ly/37GkVQF
ETV Andhra Pradesh(Youtube) - http://bit.ly/2OKARZz
Facebook - http://bit.ly/2R0vs3k
► Like us on Facebook : https://www.facebook.com/etvwin
► Follow us on Instagram : https://www.instagram.com/etvwin/
► Follow us on Twitter : https://twitter.com/ETV__Win
► Visit Website : https://www.etvwin.com/
► Pin us on Pinterest: https://in.pinterest.com/etv_win/
----------------------------------------------------------------------------------------------------------------------------
#latestnewstelugutoday
#etvandhrapradeshlive
#latestnewsupdate
ETV Andhra Pradesh has been at the forefront of Producing reliable and important news stories which happens around the globe to its viewers.
WATCH ETV ANDHRA PRADESH LIVE HERE: https://tinyurl.com/yc4thc33
For More Latest Political and News Updates :
SUBSCRIBE ► ETV Andhra Pradesh : https://shorturl.at/11HOc
#etvandhrapradeshlive #etvandhrapradeshnews #BreakingNews #TrendingNews #LiveUpdates #LatestNews #ViralNews
ETV Andhra Pradesh Live is a 24/7 Telugu news television channel in Andhra Pradesh and is a part of ETV Network dedicated to the Latest Political News, Live Reports, Exclusive Interviews, Breaking News, Sports News, Weather Updates, Entertainment, Business, and Current Affairs.
► Watch LIVE: https://bit.ly/49fdNLu
► తాజా వార్తల కోసం : http://www.ap.etv.co.in
► Follow us on WhatsApp: https://whatsapp.com/channel/0....029Va7rVJB9RZAcufTkz
► Follow us on X : https://twitter.com/etvandhraprades
► Follow us on Instagram : https://www.instagram.com/etvandhrapradesh
► Subscribe to ETV Andhra Pradesh : https://bit.ly/4g2Mgiv
► Like us on Facebook: https://www.facebook.com/ETVAndhraPradesh/
► Follow us on Threads: https://www.threads.net/@etvandhrapradesh
► ETV Andhra Pradesh News App : https://f66tr.app.goo.gl/apps
►ETV Win Website : https://www.etvwin.com/
#etvandhrapradesh #etvandhrapradeshlive #etvandhrapradeshnews #livenews #latestnews #etvandhrapradeshlive #TeluguNews #latestnews #latestnewstoday #latestnewsupdate #latestnewstelugutoday #latestnewstelugu

24 Oras is GMA Network’s flagship newscast, anchored by Mel Tiangco, Vicky Morales and Emil Sumangil. It airs on GMA-7 Mondays to Fridays at 6:30 PM (PHL Time) and on weekends at 5:30 PM. For more videos from 24 Oras, visit http://www.gmanews.tv/24oras.
#GMANews #SerbisyongTotoo #BreakingNews
Watch the latest news stories from GMA Network's trusted news programs on the GMA Play app. Download now on Google Play and App Store. Also available on GMANetwork.com/GMAPlay and Android TVs!
GMA Network promotes healthy debate and conversation online. Any abusive language that does not facilitate productive discourse will be blocked from this post.
For more updates, visit this link: https://www.youtube.com/playli....st?list=PLCpdvYcv59A
For live updates and highlights, click here: https://www.youtube.com/playli....st?list=PLCpdvYcv59A
Breaking news and stories from the Philippines and abroad:
GMA News Portal: http://www.gmanews.tv
YouTube: https://www.youtube.com/@gmanews2026
Facebook: http://www.facebook.com/gmanews
TikTok: https://www.tiktok.com/@gmanews
Twitter: http://www.twitter.com/gmanews
Instagram: http://www.instagram.com/gmanews
GMA Network Kapuso programs on GMA Pinoy TV: https://gmapinoytv.com/subscribe
#news #latestnews #headlines #bulletin
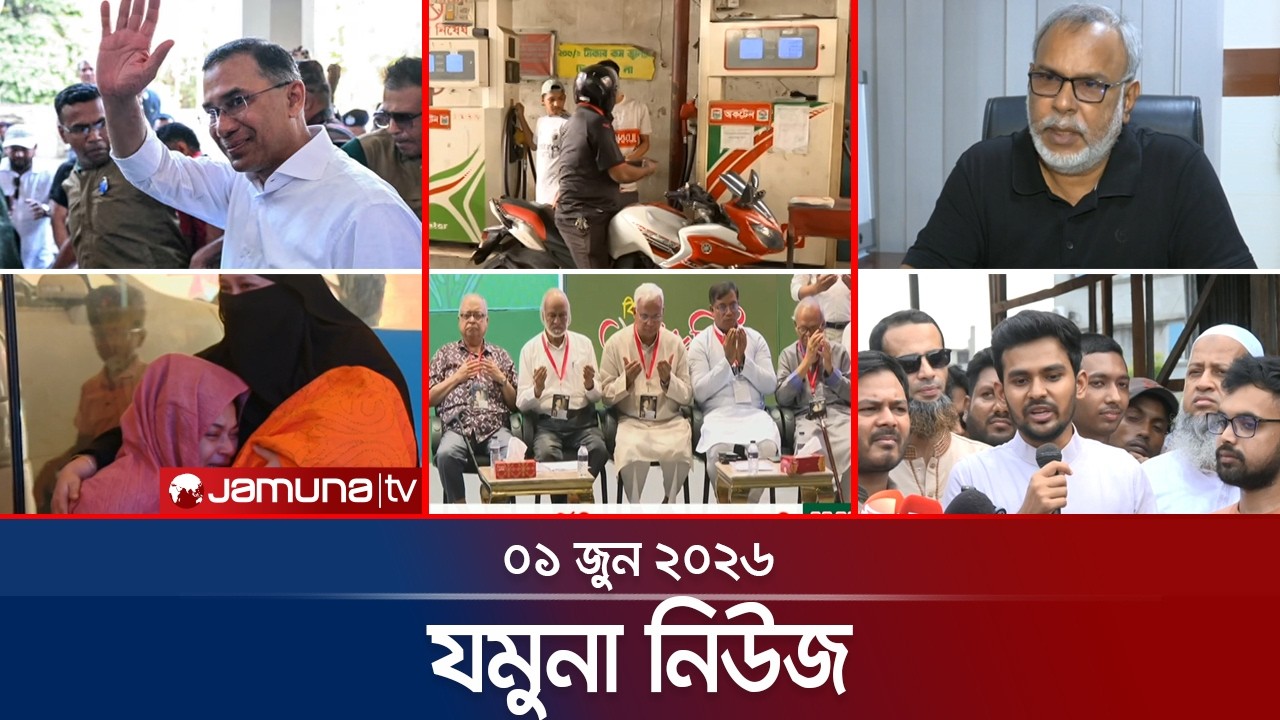
ঈদের লম্বা ছুটির পর আজ থেকে শুরু কর্মদিবস; পরিবার নিয়ে বাস-ট্রেন-লঞ্চে ব্যস্ত জীবনে ফিরছেন নগরবাস
দেশের বাজারে ফের বাড়লো জ্বালানি তেলের দাম; অকটেন-পেট্রোল-কেরোসিন লিটারে ৫ টাকা বৃদ্ধি; অপরিবর্তিত ডিজেলের মূল্য; মধ্যরাত থেকেই কার্যকর
শিশু রামিসা হত্যা মামলার শুনানি আজ: অভিযোগ গঠন হলে বিচার কার্যক্রম শুরু; আসামিদের সর্বোচ্চ সাজা প্রার্থনা করবে রাষ্ট্রপক্ষ
আদ্-দ্বীনের ৬ নবজাতক লড়াই করেছিলো কমপক্ষে ৫ ঘণ্টা; মৃত্যুর নেপথ্যে শুধু এসি বন্ধ নয়, থাকতে পারে অন্য কারণ; অনিয়ম পেলেই ব্যবস্থা বলছে স্বাস্থ্য অধিদপ্তর
Working days start today after long Eid holidays; City residents are returning to a busy life with their families on buses, trains and lunches
Fuel prices have increased again in the country's market; Octane-petrol-kerosene increased by 5 taka per liter; Diesel price unchanged; effective from midnight
Hearing of child Ramisa murder case today: Trial begins if charges are framed; State will seek maximum punishment for the accused
Ad-Din's 6 newborns fought for at least 5 hours; AC shutdown may not be the only reason behind death; Health Department says action will be taken if irregularities are found
যমুনা নিউজ | Latest News Headlines and Bulletin | Jamuna News | 8 AM | 1 June 2026 | Jamuna TV
⨳𝗔𝗯𝗼𝘂𝘁 𝗝𝗮𝗺𝘂𝗻𝗮 𝗧𝗲𝗹𝗲𝘃𝗶𝘀𝗶𝗼𝗻⨳
Jamuna Television Limited is a privately owned news and current affairs television channel in Bangladesh. Jamuna Television is also known as Jamuna TV. Founded in 2014, it is owned by the Jamuna Group. Jamuna Television strives to evolve into a truly national television network for the nation, a full national and international television network for the people of Bangladesh, not just those in urban areas and the suburbs, but for all people, in every part of the nation.
⨳𝗖𝗼𝗻𝘁𝗲𝗻𝘁 𝗥𝗶𝗴𝗵𝘁𝘀 & 𝗣𝗲𝗿𝗺𝗶𝘀𝘀𝗶𝗼𝗻𝘀⨳
JAMUNA TV retains exclusive rights to all content featured on this channel. JAMUNA TV maintains exclusive ownership of all content and extends no authorization for its use to any commercial entity or individual, except with express permission granted by JAMUNA TV (JAMUNA Television Limited).
© All rights reserved to Jamuna Television LTD, 2024.
⨳Watch more breaking news⨳
দেশের খবর ►https://www.youtube.com/playli....st?list=PLAHVDBLW1GY
দেশের রাজনীতি ►https://www.youtube.com/playli....st?list=PLAHVDBLW1GY
International News ►https://www.youtube.com/playli....st?list=PLAHVDBLW1GY
BD Crime News ►https://www.youtube.com/playli....st?list=PLAHVDBLW1GY
Jamuna i-Desk ►https://www.youtube.com/playli....st?list=PLAHVDBLW1GY
⨳𝗙𝗶𝗻𝗱 𝘂𝘀 𝗼𝗻 𝗙𝗮𝗰𝗲𝗯𝗼𝗼𝗸⨳
Jamuna Television ► https://www.facebook.com/JamunaTelevision
Jamuna TV ► https://www.facebook.com/Jamunatvglobal
Jamuna Television (Group) ► https://www.facebook.com/group....s/jamunatelevisionof
Jamuna Sports ► https://www.facebook.com/JamunaSportsWorld
Jamuna Entertainment ► https://www.facebook.com/JamunaEntertainment
⨳𝗠𝗼𝗿𝗲 𝗼𝗻 𝗬𝗼𝘂𝗧𝘂𝗯𝗲⨳
Jamuna TV Plus ► https://www.youtube.com/@jamunatvplus
Jamuna Sports ► https://www.youtube.com/@jamunasport
Jamuna Entertainment ► https://www.youtube.com/@jamunaentertain
Probashey Bangladesh ► https://www.youtube.com/@ProbasheyBangladesh
Jamuna TV Bulletin ► https://www.youtube.com/@jamunatvfullbulletin
⨳𝗙𝗶𝗻𝗱 𝘂𝘀 𝗼𝗻𝗹𝗶𝗻𝗲⨳
website ► https://www.jamuna.tv
Instagram ► https://www.instagram.com/jamunatv
Telegram ► https://t.me/JamunaTelevisionOfficial
WhatsApp ► https://whatsapp.com/channel/0....029VakgKm5LdQeemosdq
TikTok ► https://www.tiktok.com/@jamunatv
Twitter ► https://x.com/JamunaTV
Thread ► https://www.threads.net/@jamunatv
⨳𝗛𝗮𝘀𝗵𝘁𝗮𝗴𝘀⨳
#jamunatv #news #নিউজ #যমুনা #যমুনা_টিভি #jamunanews #banglanews #newsbangla #bdnews #jamunatv_youtube #newsbd
⨳𝗞𝗲𝘆𝘄𝗼𝗿𝗱𝘀⨳
latest bangladeshi news | যমুনা টিভি | Bangladesh News | Jamuna TV | Jamuna news | আজকের খবর | Jamuna Television | যমুনা নিউজ | bangla songbad | বাংলা সংবাদ | news | যমুনা টিভি আজকের খবর | Jamuna tv news | news today | খবর | নিউজ | Bangla News | Jamuna TV BD | আজকের খবর | Bangladeshi television | যমুনা টিভি খবর | Breaking News |desher khobor | saradesh | Bangladesh news | updates now | দেশের খবর | সারাদেশ | বাংলাদেশের খবর |news | latest news | latest news today | jamuna news today | সব খবর | shokaler khobor | সকালের খবর | সকালের খবর যমুনা টিভি | সকালের খবর আজকের | সকালের খবর jamuna tv | jamuna tv সকালের খবর | দেশের খবর আজকের | দেশের খবর লাইভ | দেশের খবর আজকের তাজা খবর 2025 | jamuna tv channel khobor | jamuna tv channel khabar |

Sumuko sa PNP-CIDG si Sen. Jinggoy Estrada at hindi hihiling ng protective custody ng Senado kasunod ng inilabas na arrest warrant ng Sandiganbayan.
Subscribe na sa DZMM Teleradyo para manatiling una sa balita at una sa public service!
YouTube:
https://www.youtube.com/@DZMMTeleRadyo_MSPC
Facebook:
https://www.facebook.com/DZMMTeleradyo.MSPC
TikTok:
https://www.tiktok.com/@dzmmteleradyo
Watch DZMM Teleradyo livestream on IWant: https://www.iwanttfc.com/
Sabayan ding napakikinggan sa DZMM Radyo Patrol 630 (630 kHz sa AM band)
#DZMM #DZMMTeleradyo

K Annamalai, former Tamil Nadu BJP chief, claims there is no opportunity and future in the BJP and is likely to quit after a meeting with party chief Nitin Nabin later today, sources have told NDTV.
#TamilNadu #BJP #Annamalai #PMModi
About NDTV (English news channel):
NDTV is India's Most-Trusted News Broadcaster with the latest updates in news, sports, entertainment and much more from within India and around the world. Watch big political debates, exclusive entertainment interviews, news bulletins, current affairs, talk shows and tech reviews with our 24x7 news live streams, packed with credible information across all platforms: TV, Internet and Mobile.
For Latest Videos, click here: https://www.youtube.com/playli....st?list=PLYSfYVdrOZv
To watch NDTV 24x7's premium shows listed together for your easy access, click here: https://www.youtube.com/@NDTV/playlists?view=50&sort=dd&shelf_id=5
For Ground Reports and Analysis from NDTV's reporters and anchors of day's top news stories, click here: https://www.youtube.com/playli....st?list=PLYSfYVdrOZv
For News in Shorts, click here: https://www.youtube.com/playli....st?list=PLYSfYVdrOZv
Subscribe to our channel to get latest news updates.
Follow us on Social Media:
Like us on Facebook: https://www.facebook.com/ndtv/
Follow us on Twitter: https://twitter.com/ndtv/
Follow us on Instagram: https://www.instagram.com/ndtv/
Follow us on WhatsApp: https://whatsapp.com/channel/0....029Va4lixw7z4kcvZI9J
Join NDTV on Telegram Messenger: https://t.me/NDTVbot/?start=hi
Follow us on Google News for Breaking and Latest News Updates:
NDTV: https://bit.ly/3e5ngbP
NDTV India (Hindi News): https://bit.ly/3mNVwMY
Download NDTV Mobile Apps: http://www.ndtv.com/page/apps
#BreakingNews #LatestNews #TodayNews #News #IndiaNews #NDTV #CurrentAffairs

Donald Trump’s telephone call Monday with Prime Minister Benjamin Netanyahu became quite heated as the US president pressed the Israeli leader to scale back plans for military operations in Lebanon, according to two people familiar with the conversation.
Trump at points used expletives to convey his disapproval of the planned offensive, which threatened to upend his efforts to broker a preliminary agreement with Iran.
The White House didn’t comment on the acrimonious tone of the call, which was reported by Axios.
CNN’s Kate Bolduan speaks with Axios global affairs correspondent Barak Ravid and former ambassador to the European Union Gordon Sondland weighs in during CNN This Morning’s “group chat.”
0:00 Reporter shares details of Trump’s expletive-laden phone call with Netanyahu
3:41 Will Israel change its approach to Lebanon after Trump’s phone call?
5:55 Former EU ambassador weighs in on Trump’s relationship with Netanyahu
9:56 GOP strategist reacts to the heated call
Watch more CNN here: https://cnn.it/4kh5RPe
#Trump #Netanyahu #News

#samaatv #Gaza #Israel #pakindiawar #IranUSCeasefire #StraitOfHormuz #trump #abbasaraghchi #mojtabakhamenei #asimmunir #fieldmarshalasimmunir #pmshehbazsharif #USA #TrumpNews #IslamabadTalks #india #pmshehbazsharif #zardari #pakindiawar #AnmolUrfPinki #israel #china #saudiarabia #petrol #petrolprice #pinky #weatherupdate #lahore #raininlahore #weatherforecast
Mohammad Bagher Ghalibaf, Iran’s parliament speaker and lead negotiator, has accused the US of breaching its ceasefire with Iran, including by continuing its blockade of Iranian ports and failing to restrain its ally Israel from escalating attacks in Lebanon.
Kuwait’s Foreign Ministry has condemned and denounced “the heinous and repeated Iranian attacks” on the Gulf country as the Islamic Revolutionary Guard Corps has struck a base it says was used for an attack on its Sirik Island.
US President Donald Trump says he is close to a “very good deal” with Iran as US media report he is pushing for tougher terms.
Iranian Foreign Minister Abbas Araghchi says the exchange of messages with the US is ongoing but nothing is certain until a deal is finalised.
President Trump continued to voice optimism for diplomacy early Monday, saying "Iran really wants to make a deal." He urged critics to "sit back and relax, it will all work out well in the end."
His comments on Truth Social came after the U.S. military said a new round of "self-defense strikes" targeted Iranian radar and drone sites. Central Command called it a response to "aggressive Iranian actions" including shooting down another American drone.
Iran says it retaliated for what it labeled another U.S. ceasefire violation by targeting the "airbase from which the attack originated." U.S. ally Kuwait confirmed the interception of incoming missile and drone fire.
SAMAA TV is the top Pakistani news channel covering national news from a diverse array of fields -- from politics and current affairs, business and sports to international, entertainment and culture.
Tune in to SAMAA TV to stay updated, whether at home or on the go, on all things current and relevant.
➽ Subscribe to Samaa News ➽ https://bit.ly/2Wh8Sp8
➽ Watch Samaa News Live ➽ https://bit.ly/3oUSwAP
Stay up-to-date on the major news making headlines across Pakistan on SAMAA TV’s top-of-the-hour segment. For in-depth coverage watch the bulletins.
SAMAA TV is Pakistan’s first private satellite news channel that provides live transmission simultaneously from five cities of Pakistan: Karachi, Lahore, Islamabad, Quetta and Peshawar.
SAMAA’s live news bulletins, incisive political talk shows and a wide range of programs including sports, social issues and infotainment has enabled it to position itself among the top tier news and current affairs channels of Pakistan.
SAMAA Network :
SUBSCRIBE to get the latest SAMAA News content: https://bit.ly/2Wh8Sp8
Visit https://www.samaa.tv for lightning-fast news, special updates, highlights, and exclusive analysis from top anchors and journalists across Pakistan and the globe.
📱 SAMAA TV on the Play Store: https://play.google.com/store/....apps/details?id=com.
📱 SAMAA TV on the App Store: https://apps.apple.com/pk/app/....samaa-news-app/id556
About SAMAA TV
سما ٹی وی پاکستان اور دنیا بھر کی تازہ ترین خبریں، تجزیے، اپ ڈیٹس اور بریکنگ نیوز آپ تک سب سے پہلے پہنچاتا ہے۔ سیاست، کھیل، معیشت، اور شوبز کی دنیا سے ہر بڑی اور چھوٹی خبر کے ساتھ، ہمارے ماہر تجزیہ کار اور صحافی آپ کو مستند معلومات فراہم کرتے ہیں۔
► SAMAA News YouTube Channel: https://bit.ly/2Wh8Sp8
► SAMAA Originals YouTube Channel: https://bit.ly/32c1qO3
► SAMAA MONEY YouTube channel: https://bit.ly/2EkiglJ
► SAMAA SPORTS YouTube channel: https://bit.ly/34jyINP
► SAMAA ISLAMIC YouTube channel: https://bit.ly/2LT1WMF
Keep watching SAMAA!
For latest Urdu News updates visit:
http://www.samaa.tv
http://www.facebook.com/samaatvnews
http://www.twitter.com/samaatv
http://www.instagram.com/samaatv
https://www.dailymotion.com/samaadigital
https://whatsapp.com/channel/0....029Va8EglPLCoX1JQRte

Iran has suspended talks with the United States in protest over Israel’s actions in Lebanon, the semi-official Tasnim news agency reported Monday.
Iran calls for the immediate halt of Israel’s wars in Gaza and Lebanon, along with the Israeli army’s full withdrawal from Lebanon, Tasnim said, adding that “until Iran’s and the resistance’s position on these matters is satisfied, there will be no negotiations.”
0:00 Iran announces that they are suspending talks with the U.S.
2:19 Israeli Prime Minister Benjamin Netanyahu on plan to strike “terrorist targets” in Beirut
3:09 U.S. efforts for talks continues
4:15 CNN National Security Analyst Beth Sanner on talks being suspended
5:50 Iran “using what it has as real leverage”; could close other straits
7:30 What Israel wants to achieve in Lebanon
8:59 Economics expert Iman Nasseri on what this means for oil prices
Watch more CNN here: https://cnn.it/4kh5RPe
#News #iran #lebanon #israel

Tumutok sa aming livestream ng Balitanghali ngayong June 2, 2026.
Balitanghali is a noontime GMA Network newscast, anchored by Raffy Tima and Connie Sison. It airs on GTV Mondays to Fridays at 11:00 AM (PHL Time). For more videos from Balitanghali, visit http://www.gmanews.tv/balitanghali
#GMANews #SerbisyongTotoo #BreakingNews
Watch the latest news stories from GMA Network's trusted news programs on the GMA Play app.
Download now on Google Play and App Store.
Also available on GMANetwork.com/GMAPlay and Android TVs!
GMA Network promotes healthy debate and conversation online. Any abusive language that does not facilitate productive discourse will be blocked from this post.
For more updates, visit this link: https://www.youtube.com/playli....st?list=PLCpdvYcv59A
For live updates and highlights, click here: https://www.youtube.com/playli....st?list=PLCpdvYcv59A
Breaking news and stories from the Philippines and abroad:
GMA News Portal: http://www.gmanews.tv
YouTube: https://www.youtube.com/@gmanews
Facebook: http://www.facebook.com/gmanews
TikTok: https://www.tiktok.com/@gmanews
Twitter: http://www.twitter.com/gmanews
Instagram: http://www.instagram.com/gmanews
GMA Network Kapuso programs on GMA Pinoy TV: https://gmapinoytv.com/subscribe

Breaking News : आधी रात खान सर के कोचिंग में हुई गोलीबारी ! | Khan Sir Coaching Fire | Patna News
#khansir #khansircoaching #patnanews
इस वक्त की बड़ी खबर
- खान सर के कोचिंग में तोड़फोड़
- फायरिंग की आवाज से अफरा तफरी का माहौल
- मौके पर बड़ी संख्या में पहुंची पुलिस
- कदमकुआ थाना क्षेत्र स्थित मछुआटोली स्थित कोचिंग में गोलीबारी
बिहार और झारखंड के ताज़ा ख़बरों के लिए देखते रहिए News18 Bihar/Jharkhand
#news18biharjharkhand #latestnews #BiharJharkhandnews
For all the latest news from Bihar and Jharkhand, keep watching News18 Bihar Jharkhand LIVE TV on YouTube.
Watch News18 Bihar Jharkhand LIVE for the latest Hindi live news, breaking news, aaj ki taaza khabar, and aaj ka taaza samachar, including updates on CM Samrat Choudhary, Nitish Kumar, Hemant Soren, Bihar news, Jharkhand news, and Bihar Jharkhand news today; stay informed on Bihar Vidhan Parishad elections, Bihar Legislative Council Election, Punjab Municipal Corporation election vote counting, Punjab MC election results, Punjab civic body election results, Punjab Nikay Chunav 2026, SIR, Bihar MLC Election, and major stories like Twisha Sharma case Bhopal, Siddaramaiah resignation, Karnataka new CM DK Shivakumar, Bengal CM Suvendu Adhikari news, NEET paper leak, IPL 2026; international coverage on Iran Israel war news today, Iran America war update; stay updated with market trends like petrol diesel CNG prices, crude oil prices, gold silver price, stock market, and weather alerts including IMD news, heatwave, monsoon updates, and El Nino effect, bringing you fast, accurate updates from Bihar, Jharkhand, and across India only on News18 Bihar Jharkhand LIVE.
News18 Bihar Jharkhand is one of most watched Hindi Regional News channel.
Here you can watch hindi news, breaking news, top news, top news today, breaking news today, hindi news live, live news, politics news, latest news, entertainment news, local news, regional news, district news & more.
भारत का एक मात्र भरोसेमंद और लोकप्रिय न्यूज़ चैनल है। यह चैनल नेटवर्क १८ का हिस्सा है। यह चैनल Bihar & Jharkhand के सभी क्षेत्रीय खबरों के साथ साथ सरकार, राजनीति, पर्यावरण , खेल-कूद से जुड़ी राष्ट्रीय एवं अंतराष्ट्रीय खबरें प्रसारित करता है|
Subscribe to our channel for latest news updates: http://bit.ly/1qCxCUe
Website: https://bit.ly/2DXNi2I
Like Us: https://www.facebook.com/News18Bihar/
https://www.facebook.com/News18Jharkhand/
Follow Us: https://twitter.com/News18Bihar
https://twitter.com/News18Jharkhand
News18 Mobile App - https://onelink.to/desc-youtube

The second batch of the Mandelson files has been released.
#keirstarmer #labour #petermandelson #uknews
Beat the system with TallyMoney. Gold you can spend. Discover more here:
https://click.tallymoney.com/A64P/xuvbajli #ad
The purchase of gold and investment in bullion is not FCA regulated nor do they benefit from the protections of the Financial Services Compensation Scheme or the Financial Ombudsman Service. The value of your investment can go down as well as up. Consider the risks involved before choosing to invest. This card is issued by Transact Payments Limited pursuant to licence by Mastercard International Incorporated
Keep up to date with GB News at gbnews.com or on X @GBNEWS
Become a Friend of GB News: gbnews.com/friend

#news #latestnews #headlines #bulletin
সেই জঙ্গল সলিমপুরে এখনও বন্ধ হয়নি চাঁদাবাজি। চট্টগ্রামের ভয়ংকর এই জনপদে বসবাসরতদের অভিযোগ, দুই বাহিনীর সদস্যরা এখনও সক্রিয়। চাঁদা না দিলে নিয়ে যায় গোপন টর্চার সেলে। যৌথ অভিযানের পর প্রশাসন নিয়ন্ত্রনে নিলেও, ধরা পড়েনি মূল হোতারা। চাঁদা চাইলে পুলিশকে জানাতে বলছেন কর্মকর্তারা।
Extortion has not stopped in that jungle Salimpur. Residents of this dangerous town in Chittagong allege that members of the two forces are still active. If they do not pay the ransom, they are taken to secret torture cells. Although the administration took control after a joint operation, the main instigators have not been caught. Officials are asking people to inform the police if they want a ransom.
ভারত থেকে পুশইনের চেষ্টা যে কোন মূল্যে প্রতিহত করবে বাংলাদেশ। সরকারের এই অবস্থান স্পষ্ট করে পররাষ্ট্র প্রতিমন্ত্রী বলছেন, অন্তত ৪ বার বিভিন্ন সীমান্ত দিয়ে পুশইনের চেষ্টা করেছে দেশটি। এটি বন্ধে দিল্লিকে, ঢাকা আবারো কূটনৈতিক পত্র পাঠিয়েছে উল্লেখ করে প্রয়োজনে রাজনৈতিক যোগাযোগের কথাও জানান তিনি। বলেন, আগামী সপ্তাহে দিল্লিতে বৈঠকে বসছেন দু'দেশের সীমান্তরক্ষী বাহিনীর শীর্ষ কর্মকর্তারা।
ঠাকুরগাঁওয়ে আশঙ্কাজনক হারে বেড়েছে ব্যাটারিচালিত অটোরিক্সা ও ইজিবাইক চুরির ঘটনা। কখনো যাত্রী সেজে চালকের হাত পা বেধে, কখনো অজ্ঞান করে অথবা বাড়ির সামনে থেকে চুরি করছে একটি সংঘবদ্ধ চক্র। এতে আতঙ্কিত হয়ে পড়েছেন. গাড়ির মালিক ও চালকরা। ভুক্তভোগীরা বলছেন, এ বিষয়ে পুলিশের তেমন সহযোগিতা পাওয়া যাচ্ছে না। তবে জেলা পুলিশের ঊর্ধ্বতন কর্মকর্তার দাবি, মাঠ পর্যায়ে কাজ করছেন তারা।
যমুনা নিউজ | Latest News Headlines and Bulletin | Jamuna News | 8 AM | 02 June 2026 | Jamuna TV
⨳𝗔𝗯𝗼𝘂𝘁 𝗝𝗮𝗺𝘂𝗻𝗮 𝗧𝗲𝗹𝗲𝘃𝗶𝘀𝗶𝗼𝗻⨳
Jamuna Television Limited is a privately owned news and current affairs television channel in Bangladesh. Jamuna Television is also known as Jamuna TV. Founded in 2014, it is owned by the Jamuna Group. Jamuna Television strives to evolve into a truly national television network for the nation, a full national and international television network for the people of Bangladesh, not just those in urban areas and the suburbs, but for all people, in every part of the nation.
⨳𝗖𝗼𝗻𝘁𝗲𝗻𝘁 𝗥𝗶𝗴𝗵𝘁𝘀 & 𝗣𝗲𝗿𝗺𝗶𝘀𝘀𝗶𝗼𝗻𝘀⨳
JAMUNA TV retains exclusive rights to all content featured on this channel. JAMUNA TV maintains exclusive ownership of all content and extends no authorization for its use to any commercial entity or individual, except with express permission granted by JAMUNA TV (JAMUNA Television Limited).
© All rights reserved to Jamuna Television LTD, 2024.
⨳Watch more breaking news⨳
দেশের খবর ►https://www.youtube.com/playli....st?list=PLAHVDBLW1GY
দেশের রাজনীতি ►https://www.youtube.com/playli....st?list=PLAHVDBLW1GY
International News ►https://www.youtube.com/playli....st?list=PLAHVDBLW1GY
BD Crime News ►https://www.youtube.com/playli....st?list=PLAHVDBLW1GY
Jamuna i-Desk ►https://www.youtube.com/playli....st?list=PLAHVDBLW1GY
⨳𝗙𝗶𝗻𝗱 𝘂𝘀 𝗼𝗻 𝗙𝗮𝗰𝗲𝗯𝗼𝗼𝗸⨳
Jamuna Television ► https://www.facebook.com/JamunaTelevision
Jamuna TV ► https://www.facebook.com/Jamunatvglobal
Jamuna Television (Group) ► https://www.facebook.com/group....s/jamunatelevisionof
Jamuna Sports ► https://www.facebook.com/JamunaSportsWorld
Jamuna Entertainment ► https://www.facebook.com/JamunaEntertainment
⨳𝗠𝗼𝗿𝗲 𝗼𝗻 𝗬𝗼𝘂𝗧𝘂𝗯𝗲⨳
Jamuna TV Plus ► https://www.youtube.com/@jamunatvplus
Jamuna Sports ► https://www.youtube.com/@jamunasport
Jamuna Entertainment ► https://www.youtube.com/@jamunaentertain
Probashey Bangladesh ► https://www.youtube.com/@ProbasheyBangladesh
Jamuna TV Bulletin ► https://www.youtube.com/@jamunatvfullbulletin
⨳𝗙𝗶𝗻𝗱 𝘂𝘀 𝗼𝗻𝗹𝗶𝗻𝗲⨳
website ► https://www.jamuna.tv
Instagram ► https://www.instagram.com/jamunatv
Telegram ► https://t.me/JamunaTelevisionOfficial
WhatsApp ► https://whatsapp.com/channel/0....029VakgKm5LdQeemosdq
TikTok ► https://www.tiktok.com/@jamunatv
Twitter ► https://x.com/JamunaTV
Thread ► https://www.threads.net/@jamunatv
⨳𝗛𝗮𝘀𝗵𝘁𝗮𝗴𝘀⨳
#jamunatv #news #নিউজ #যমুনা #যমুনা_টিভি #jamunanews #banglanews #newsbangla #bdnews #jamunatv_youtube #newsbd
⨳𝗞𝗲𝘆𝘄𝗼𝗿𝗱𝘀⨳
latest bangladeshi news | যমুনা টিভি | Bangladesh News | Jamuna TV | Jamuna news | আজকের খবর | Jamuna Television | যমুনা নিউজ | bangla songbad | বাংলা সংবাদ | news | যমুনা টিভি আজকের খবর | Jamuna tv news | news today | খবর | নিউজ | Bangla News | Jamuna TV BD | আজকের খবর | Bangladeshi television | যমুনা টিভি খবর | Breaking News |desher khobor | saradesh | Bangladesh news | updates now | দেশের খবর | সারাদেশ | বাংলাদেশের খবর | bangla news today | যমুনা টিভি | bangla tv news | Bangladesh news | Jamuna TV | Jamuna news | আজকের খবর | Jamuna Television | bangla songbad | বাংলা সংবাদ | news | latest news | latest news today | jamuna news today | সব খবর | shokaler khobor | সকালের খবর | সকালের খবর যমুনা টিভি | সকালের খবর আজকের | সকালের খবর jamuna tv | jamuna tv সকালের খবর | দেশের খবর আজকের | দেশের খবর লাইভ | দেশের খবর আজকের তাজা খবর 2025 | jamuna tv channel khobor | jamuna tv channel khabar |

Israel continued its attacks in southern Lebanon on Tuesday, but did not strike Beirut following a partial ceasefire agreement with the Iran-backed armed group Hezbollah.
Lebanon said that, under an agreement announced by US President Donald Trump late on Monday, Israeli forces would not bomb the capital in exchange for Hezbollah not attacking Israel.
It came after Iran said Israeli action in Lebanon jeopardised talks on a deal to end its war with the US.
Following the ceasefire announcement, the Israeli military said it had intercepted two projectiles fired into northern Israel. Hezbollah said it had attacked Israeli forces in southern Lebanon, where officials reported deadly Israeli strikes.
Subscribe to our channel here: https://bbc.in/bbcnews
For the latest news download the BBC News app or visit BBC.com/news
#BBCNews
![Unang Balita sa Unang Hirit: (Part 2) June 2, 2026 [HD]](https://i.ytimg.com/vi/MUUa0EBsNMk/maxresdefault.jpg)
Narito ang mga nangungunang balita ngayong June 2, 2026
- Sen. Jinggoy Estrada, nakakulong na sa New Quezon City Jail matapos ipaaresto para sa kasong plunder | Sen. Estrada: "Maraming beses akong inalok na talikuran ang majority bloc, pero hindi ko tinanggap" | Sen. Estrada, iginiit na inosente siya at handa raw depensahan ang sarili sa korte | Senate Pres. Cayetano at DILG Sec. Remulla, nagkataasan ng boses habang isinisilbi ang arrest warrant kay Estrada | Ilang kapwa-majority senators ni Estrada, nagpakita ng suporta sa kaniya | Dating DPWH Sec. Bonoan na akusado rin ng plunder, naka-hospital arrest matapos tumaas ang presyon | 3 pang opisyal ng DPWH na akusado ng plunder, ipinaaaresto rin ng Sandiganbayan
- House Prosecution Team, agad daw tutugon kapag natanggap na ang kopya ng mga sagot ni VPSD sa articles of impeachment | House Prosecution Team, hindi nababahala kahit muling magpalit ng liderato ang Senado | House prosecution team, pinag-aaralan ang pag-i-issue ng subpoena sa ilang taga-DepEd at OVP officials para sa impeachment trial
- Presyo ng karne ng baboy sa ilang palengke, bumaba; matumal na benta, problema ng ilang nagtitinda | Hiling ng SINAG: Ibalik sa 30% ang taripa sa imported pork para maiwasan ang tuluyang pagkalugi ng local hog raisers at pork vendors
- Ilang tsuper, natuwa sa big-time oil price rollback ngayong araw
- Murang sapatos para sa balik-eskuwela, mabibili sa Marikina
Unang Balita is the news segment of GMA Network's daily morning program, Unang Hirit. It's anchored by Arnold Clavio, Susan Enriquez, Ivan Mayrina, and Mariz Umali, and airs on GMA-7 Mondays to Fridays at 5:30 AM (PHL Time).
For more videos from Unang Balita, visit http://www.gmanetwork.com/unangbalita. For Kapuso abroad, subscribe to GMA Pinoy TV (http://www.gmapinoytv.com/) for GMA programs.
#GMANews #SerbisyongTotoo #BreakingNews
Watch the latest news stories from GMA Network's trusted news programs on the GMA Play app.
Download now on Google Play and App Store.
Also available on GMANetwork.com/GMAPlay and Android TVs!
GMA Network promotes healthy debate and conversation online. Any abusive language that does not facilitate productive discourse will be blocked from this post.
For more updates, visit this link: https://www.youtube.com/playli....st?list=PLCpdvYcv59A
For live updates and highlights, click here: https://www.youtube.com/playli....st?list=PLCpdvYcv59A
Breaking news and stories from the Philippines and abroad:
GMA News Portal: http://www.gmanews.tv
YouTube: https://www.youtube.com/@gmanews2026
Facebook: http://www.facebook.com/gmanews
TikTok: https://www.tiktok.com/@gmanews
Twitter: http://www.twitter.com/gmanews
Instagram: http://www.instagram.com/gmanews
GMA Network Kapuso programs on GMA Pinoy TV: https://gmapinoytv.com/subscribe

Iran has reportedly suspended peace negotiations with the United States following Israel's escalating military strikes in southern Beirut, which Tehran claims violate the ceasefire agreement. The Iranian Revolutionary Guard struck a container ship alleged to have American links, while Israeli Prime Minister Benjamin Netanyahu ordered fresh attacks on what he described as Hezbollah's terrorist headquarters. Despite the tensions, US President Donald Trump maintains that peace negotiations are progressing rapidly and claims to have brokered assurances between Israel and Hezbollah to halt mutual attacks.
Subscribe and set 🔔 » https://7news.link/YTSubscribe |
For the latest Australian news and breaking news alerts, connect with 7NEWS online:
Visit » https://7news.com.au
7Plus » https://7plus.com.au/
7NEWS Podcast » https://open.spotify.com/user/....dm9fk9hzoe68ibptther
Facebook » https://www.facebook.com/7NewsAustralia
TikTok » https://www.tiktok.com/@7newsaustralia
Instagram » https://www.instagram.com/7newsaustralia/
X » https://x.com/7NewsAustralia
7NEWS combines the trusted and powerful news brands including Sunrise, The Morning Show, Spotlight and 7NEWS.com.au, delivering unique, engaging and continuous coverage on the issues that matter most to Australians. Watch 7 News Australia full broadcasts and full episodes at 6pm and weekdays at 12pm and 4pm on Channel 7 and 7plus.
#BREAKINGNEWS #7NEWS

Fox News' Christina Coleman provides details after the remains of Melissa Casias, a Los Alamos National Laboratory employee, were found in a New Mexico forest. #foxnews #news #fnc #fox #missingscientist #melissacasias #scientist #crime #us #missingperson
Subscribe to Fox News! https://bit.ly/2vBUvAS
Watch more Fox News Video: http://video.foxnews.com
Watch Fox News Channel Live: http://www.foxnewsgo.com/
FOX News Channel (FNC) is a 24-hour all-encompassing news service delivering breaking news as well as political and business news. The number one network in cable, FNC has been the most-watched television news channel for 18 consecutive years. According to a 2020 Brand Keys Consumer Loyalty Engagement Index report, FOX News is the top brand in the country for morning and evening news coverage. A 2019 Suffolk University poll named FOX News as the most trusted source for television news or commentary, while a 2019 Brand Keys Emotion Engagement Analysis survey found that FOX News was the most trusted cable news brand. A 2017 Gallup/Knight Foundation survey also found that among Americans who could name an objective news source, FOX News was the top-cited outlet. Owned by FOX Corporation, FNC is available in nearly 90 million homes and dominates the cable news landscape, routinely notching the top ten programs in the genre.
Watch full episodes of your favorite shows
The Five: https://www.foxnews.com/video/shows/the-five
Special Report with Bret Baier: https://www.foxnews.com/video/shows/special-report
Jesse Watters Primetime: https://www.foxnews.com/video/....shows/jesse-watters-
Hannity: https://www.foxnews.com/video/shows/hannity
The Ingraham Angle: https://www.foxnews.com/video/shows/ingraham-angle
Gutfeld!: https://www.foxnews.com/video/shows/gutfeld
Fox News @ Night: https://www.foxnews.com/video/shows/fox-news-night
Follow Fox News on Facebook: https://www.facebook.com/FoxNews/
Follow Fox News on Twitter: https://twitter.com/FoxNews/
Follow Fox News on Instagram: https://www.instagram.com/foxnews/
