- Film & Animation
- Music
- Pets & Animals
- Sports
- Travel & Events
- Gaming
- People & Blogs
- Comedy
- Entertainment
- News & Politics
- How-to & Style
- Non-profits & Activism
- Religion & Spiritual
- Health Natural Remedies
- Gardening +
- Arts & Crafts
- Action
- Hair & Beauty
- Hunting & Survival
- Shopping & Reviews
- Motivational & Self Help
- Jesus
- Marriage
- Live TV
- Programing & Coding
- Latest & Gadgets
- Make You Own
- Unexplained & Stange
- Jesus Christ
- Food & More
- Other
Top videos


963HZ 》FREQUENCY OF GODS 》Ask Universe What You Want 》Manifest Anything. Its all based on Law of Attraction
You can use this as sleep music, please play at low volumes.
Q: How to Manifest Anything and Ask Universe Whatever You Want?
1 : Get very clear about what you want. When you are very clear about your own deepest desire, when you are in touch with that, you can take steps to manifest that.
2 : Once you know what you want, its time to ask the universe. Meditate, Visualise, Prayer - every thing helps.
3 : Create space and time in your life for the new positive things to manifest. Its very easy to get in the grind and hustle and becoming busy in taking steps to make something happen, but you must also create the space and time in your life to let those new experiences come in. Time to enjoy and smile at those small experiences which make our life beautiful.
4 : Give before you can receive. This derives from step 3. You need to give away whatever is occupying your time and space to receive something new. So, whatever you are hoarding, let go. Whatever you are clinging to, let go.
5 : Gratitude always. Always and Always thank you the universe for whatever comes into your life. Do not reject, embrace it. With open arms. Everyday is a blessing of that creator to experience something new in this life, embrace it.
6 : Raise the vibration in and around you. Meditate, exercise, smile, and keep the things inside and outside in your environment clean and positive. Play positive energy music in the house and office.
7 : Miracles do happen. Trust the process. When you are ready to receive, you will be amazed how everything in this journey panned out and conspired to manifest your inner desire.
Read More at http://www.meditativemind.org
Copyright ⓒ 2019 Meditative Mind™. All Rights Reserved.
MM19034
#MeditativeMind #Solfeggio #963Hz

639 Hz - Experience PURE POSITIVE LOVE ENERGY. Healing Music based on Miracle Tone 639Hz is also associated with Heart Chakra. This is the solfeggio frequency of Compassion and Eternal Love.
Benefits of 639 Hz frequency includes
✓ Enables creation of harmonious interpersonal relationships
✓ This tone can be used for dealing with relationships problems – those in family, between partners, friends.
✓ Talking about cellular processes, 639 Hz frequency can be used to encourage the cell to communicate with its environment
✓ Enhances communication, understanding, tolerance and love.
We hope this will help you.
Copyright ⓒ 2018 Meditative Mind. All Right Reserved.
http://www.meditativemind.org

10 hours of blissful and relaxing 432 Hz music. This tuning is said to have a healing effect on our body, mind and emotions. Although we call this sleep music, you may find that it goes hand in hand with relaxing, meditating, studying, therapy, yoga, etc.
Mp3 DOWNLOAD full length: http://bit.ly/2rXhIeY
iTunes 432Hz Miracle Sleep Album: https://apple.co/2Gx44kR
Royalty Free Music: www.highermindroyaltyfreemusic.com
Listening to 432Hz music resonates inside our body, releases emotional blockages, and expands our consciousness. 432Hz allows us to tune into the wisdom of the Universe, Divine Intelligence and our Soul. It creates Unity instead of separation. It expands our hearts and makes us more compassionate and loving. One thing is for sure. A person who resonates with love has inner peace – and this is the starting point for a world where we live in Unity, Peace and Harmony with each-other and Mother Earth.
Modern science has begun to recognize what the ancient mystics and wise men have told us for centuries; that everything is in a constant state of vibration. Everything down to the smallest physical particle to the things we cannot perceive with our (yet) limited senses.
The most elemental state of vibration is that of sound. Everything has an optimum range of vibration (frequency), and that rate is called resonance. When we are in resonance, we are in balance. Every organ and every cell in our precious body absorbs and emits sound with particular optimum resonance frequency. 432hz and 528hz tuned music creates resonance in our physical, mental, emotional and spiritual body.
★☆★ The BEST Sleep & Relaxation Music for Children: https://www.youtube.com/channe....l/UCwHO92Tu97JWHzl3R
................................
INFO ON 432HZ MUSIC:
http://www.powerthoughtsmedita....tionclub.com/info-on
…………………….
DOWNLOAD OUR SINGLES & ALBUMS HERE:
DOWNLOAD OUR SINGLES & ALBUMS HERE:
ITUNES ►http://apple.co/2lp23Rr
AMAZON ► http://amzn.to/2kx0RcZ
MP3 AUDIO SHOP ► https://powerthoughtsmeditationclub.dpdcart.com
SPIRITUAL CLOTHING ► https://.powerthoughtsclothing.com
NEED MUSIC FOR YOUR PROJECTS?
Royalty-Free & Commercial Use Music Licenses
► https://www.highermind-royalty....freemusic.com/?ref=2
BOUNDARY SETTING COURSE AVAILABLE NOW:
✦ Set Conscious Boundaries: Stand Up For Yourself & Let Go Of People Pleasing For Good ✦
20 lessons filled with theoretical and practical knowledge that will take your boundary-setting skills to the next level: https://kennethsoares.earth/co....urses/set-healthy-bo
...................
We are forever grateful to everyone that supports us just by tuning in to our channel, and for all you who buy our meditations, solfeggios and music! You make it POSSIBLE for us to continue our life purpose! From our hearts we Thank You!
…………………….
FAQ - HOW TO USE SOLFEGGIO FREQUENCIES :
http://www.powerthoughtsmedita....tionclub.com/how-to-
WHAT ARE THE SOLFEGGIO FREQUENCIES:
http://www.powerthoughtsmedita....tionclub.com/what-is
HOW TO DO GUIDED MEDITATION:
http://www.powerthoughtsmedita....tionclub.com/how-to-
HOW TO USE AFFIRMATIONS:
http://www.powerthoughtsmedita....tionclub.com/how-to-
WHAT ARE AFFIRMATIONS:
http://www.powerthoughtsmedita....tionclub.com/what-ar
INFO ON BINAURAL BEATS:
http://www.powerthoughtsmedita....tionclub.com/info-on
INFO ON 432HZ MUSIC:
http://www.powerthoughtsmedita....tionclub.com/info-on
INFO ON 528HZ MUSIC:
http://www.powerthoughtsmedita....tionclub.com/info-on
POWERTHOUGHTS MEDITATION CLUB
We are very proud of our hard work and commitment to creating HIGH quality Guided Meditations, Affirmation audios, Hypnosis sessions, Solfeggios, and Relaxing Music. We put our Heart and Soul into every video we create with the intention to create something valuable for YOU, so that you can walk the path of life feeling much more positive, conscious and empowered.
Our grand mission is to raise the energy vibration of our planet and to make this world a more Loving - Peaceful and Joyful place for ALL organic life. To help and inspire YOU and the other millions of people listening to our audios to awaken to that awesome POWER we have within us. Prepare to open up the gates and let the pure lifeforce from YOUR HIGHER SELF and SOURCE ESSENCE to flow through you NOW. Enjoy your journey.
For Freedom, Love & Peace,
Kenneth & Alexander - PTMC
………………………
WEBSITE
➤ http://PowerThoughtsMeditationClub.com
..............................
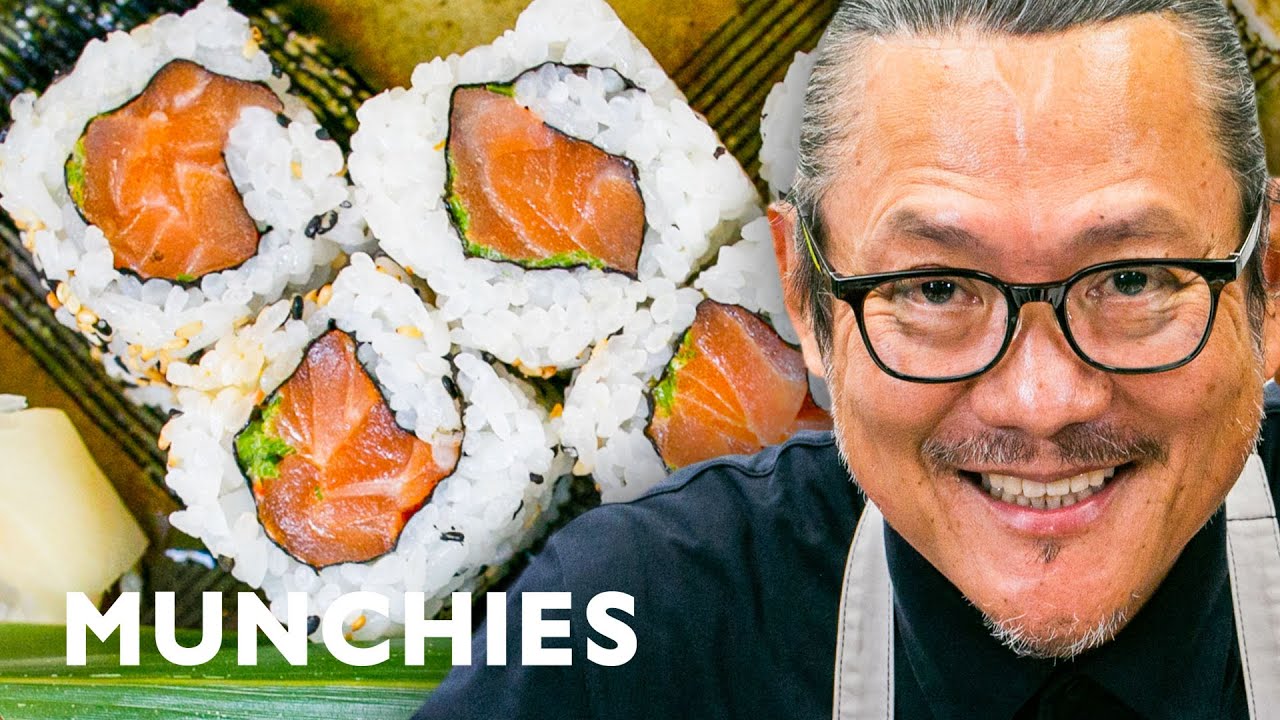
Iron Chef Morimoto is in the Munchies Test Kitchen to share his wisdom and love of sushi making, using a few special techniques and tips. Moriomoto demonstrates how to wash and cook sushi rice, prepare seasoned rice vinegar, and tips and tricks for making different kinds of maki rolls. As Morimoto says, it takes technique, ingredients, and love.
Subscribe to Munchies here: http://bit.ly/Subscribe-to-MUNCHIES
All Munchies videos release a full week early on our site: https://video.vice.com/en_us/channel/munchies
Hungry? Sign up here for the MUNCHIES Recipes newsletter.
https://www.vice.com/en_us/pag....e/sign-up-for-munchi
Check out http://munchies.tv for more!
Follow Munchies here:
Facebook: http://facebook.com/munchies
Twitter: http://twitter.com/munchies
Tumblr: http://munchies.tumblr.com
Instagram: http://instagram.com/munchies
Pinterest: https://www.pinterest.com/munchies
Foursquare: https://foursquare.com/munchies
More videos from the VICE network: https://www.fb.com/vicevideo

The EASIEST way to fold a Palm Leaf cross for Palm Sunday. Learn how to prepare the leaves too. Here's my paper cross tutorial if you have no palm leaves: https://www.youtube.com/watch?v=5hzHfhXSDYk&t=32s All ages love learning how to fold palm crosses. Find many more Easter lesson ideas in this playlist: EASTER LESSON IDEAS for church, school and home
https://www.youtube.com/playli....st?list=PLvEb8AA7B8J
0:00 how to make a palm cross tutorial
2:33 how to prepare your palm leaves
2:50 trim the ends
2:53 prepare extra palm leaves to share
For 200+ ideas check out my channel homepage here: https://www.youtube.com/channe....l/UCJtwux8JyjcqxlUvG
My website: https://www.wrightideaswithsusan.com/
Facebook https://www.facebook.com/wrigh....tideaswithsusan/?fre
Pinterest https://www.pinterest.com.au/wrightgirl91/
*Please do not download or copy this clip illegally. You can freely watch this clip directly from Youtube or you can send or embed the url link to share with others. I also highly recommend a subscription to Youtube Premium as you can download offline and no ads will pop up when you watch youtube. (Psalms 41:12)
And more ideas on these playlists:
EASTER GAME IDEAS for children at home, school, church & Sunday School
https://www.youtube.com/watch?v=YiwYPjVzZys&list=PLvEb8AA7B8J941m8jlMexYJHokgTnlUOT
EASTER CRAFT IDEAS for SUNDAY SCHOOL https://www.youtube.com/playli....st?list=PLvEb8AA7B8J
EASTER SONGS for KIDS (Christian) for School, church & home
https://www.youtube.com/watch?v=E2BZV7m4BUY&list=PLvEb8AA7B8J8dliM0RbGhuwgBmiSOGNNs
PALM SUNDAY SONGS & VIDEO CLIPS
https://www.youtube.com/playli....st?list=PLvEb8AA7B8J
EASTER VIDEOS FOR CHILDREN: good for home, church and school
https://www.youtube.com/playli....st?list=PLvEb8AA7B8J
EASTER MEMORY VERSE IDEAS for SUNDAY SCHOOL https://www.youtube.com/playli....st?list=PLvEb8AA7B8J
EASTER STORY videos for young children - in order https://www.youtube.com/playli....st?list=PLvEb8AA7B8J
BEAUTIFUL EASTER SONGS sung by Claire Ryan Crosby https://www.youtube.com/playli....st?list=PLvEb8AA7B8J
ART & CRAFT TUTORIALS for KIDS https://www.youtube.com/playli....st?list=PLvEb8AA7B8J
THE JESUS STORY FOR CHILDREN – Jesus Film in shorter clips
https://www.youtube.com/playli....st?list=PLvEb8AA7B8J
LESSONS ABOUT FAITH for CHILDREN’S MINISTRY
https://www.youtube.com/playli....st?list=PLvEb8AA7B8J
GENESIS CREATION LESSON IDEAS: https://www.youtube.com/watch?v=zHeXBR4rl54&list=PLvEb8AA7B8J_O3ViEf0xYHcr7UfeYS2ZD
LYRIC MUSIC VIDEOS for KIDS MINISTRY: https://www.youtube.com/watch?v=KlfSCdll4LU&list=PLvEb8AA7B8J88Abaxut3Rd_l-el0pk0gE
QUICK & EASY WAYS to teach a Bible story to CHILDREN:
https://www.youtube.com/watch?v=pIOHfpflz7o&list=PLvEb8AA7B8J_dVY-kVPIiW9VGMlL1jQEG
OBJECT LESSONS for teaching KIDS at CHURCH, HOME & SCHOOL https://www.youtube.com/watch?v=GG6GBhLRRwE&list=PLvEb8AA7B8J_lGuRWrGM3HxqaoFiTHb49
BIBLE MEMORY VERSES: UNIQUE WAYS TO TEACH A VERSE https://www.youtube.com/watch?v=osWHfZaSGOE&list=PLvEb8AA7B8J8wlNEZRfHmqxDwnSlwLp6g
GAME IDEAS for SUNDAY SCHOOL, KIDS CHURCH, HOME, SCHOOL & KIDS PARTIES: https://www.youtube.com/watch?v=KtpKcnhUbR4&list=PLvEb8AA7B8J-jzgtbdMeGFMvnP_zE6ss2
EASY CRAFT IDEAS for CHILDREN’S MINISTRY https://www.youtube.com/watch?v=5swQU17s1QI&list=PLvEb8AA7B8J9YMIjkihy4IxG2PE5JLVFk
CHRISTMAS LESSON IDEAS FOR CHILDREN’S MINISTRY
https://www.youtube.com/watch?v=rqscUcz1COI&list=PLvEb8AA7B8J9tLK1FuBJsfWUFsX-7WJKo
#palmsundaycross #howtomakepalmcross #palmleafcraft #eastercross
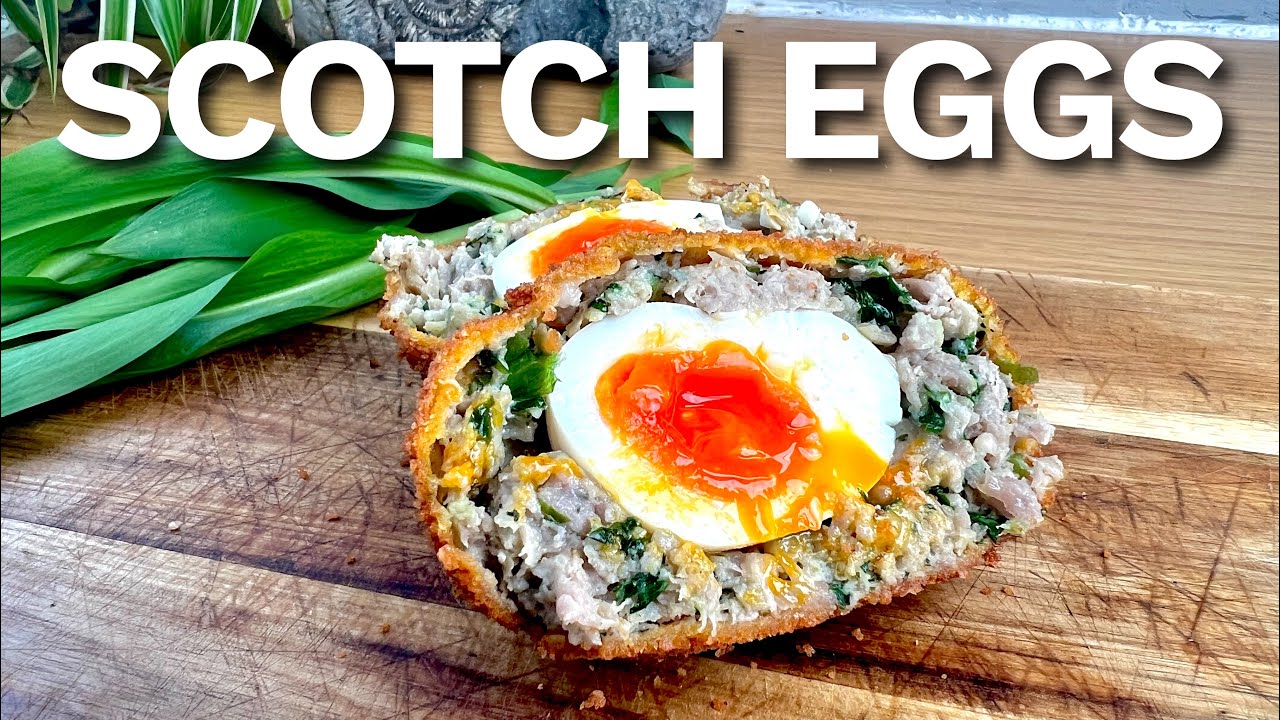
Scotch eggs are a perfect way to incorporate wild garlic, you can get creative with what you add to your sausage mix but let the wild garlic be the dominant flavour and you won't regret it.
ingredients:
Eggs (extra for coating)
Sausage meat
wild garlic
Oil (I used duck fat but any oil that can handle high heat will do)
Bread crumbs
Boil your eggs for 7 minutes (8 min for hard boiled) then add to cold water to stop them cooking. Chop the wild garlic and add to the sausage meat, you can add what you like at this stage... get creative. Cut some clingfilm and lightly oil the surface, flatten out your sausage meat, add the peeled egg and make sure it's completely incased in the meat. Coat in beaten egg and then breadcrumbs and repeat for an extra crunch. Heat your oil until a cube of bread turns golden brown in 1 minute and then add your eggs and cook for 6 minutes until they also turn a nice golden brown. Place on kitchen roll or a wire rack to cool slightley and then serve. These will keep in the fridge for a couple of days and make great picnic food. ENJOY!
Thanks for watching
📸 Instagram: https://www.instagram.com/hazeoutdoors/?hl=en
💚 Become a Patron and gain access to patron only videos, podcasts, giveaways and more: https://www.patreon.com/join/hazeoutdoors
👍 Check out my Amazon page for things I use & recommend: https://www.amazon.co.uk/shop/hazeoutdoors
❤️ 🫡 Direct Support with no middle man: https://www.paypal.com/donate?....token=u2Aw4GHBoKPwNZ
👕 Haze Clothing: https://teespring.com/en-GB/stores/hazeoutdoors
🍺☕️ For those that would like to buy me a drink: https://www.buymeacoffee.com/HazeOutdoors
If you buy things off Amazon using the link above then you get your items at no extra cost and I get a small kick back which goes toward making future content.
Much love. Hazy

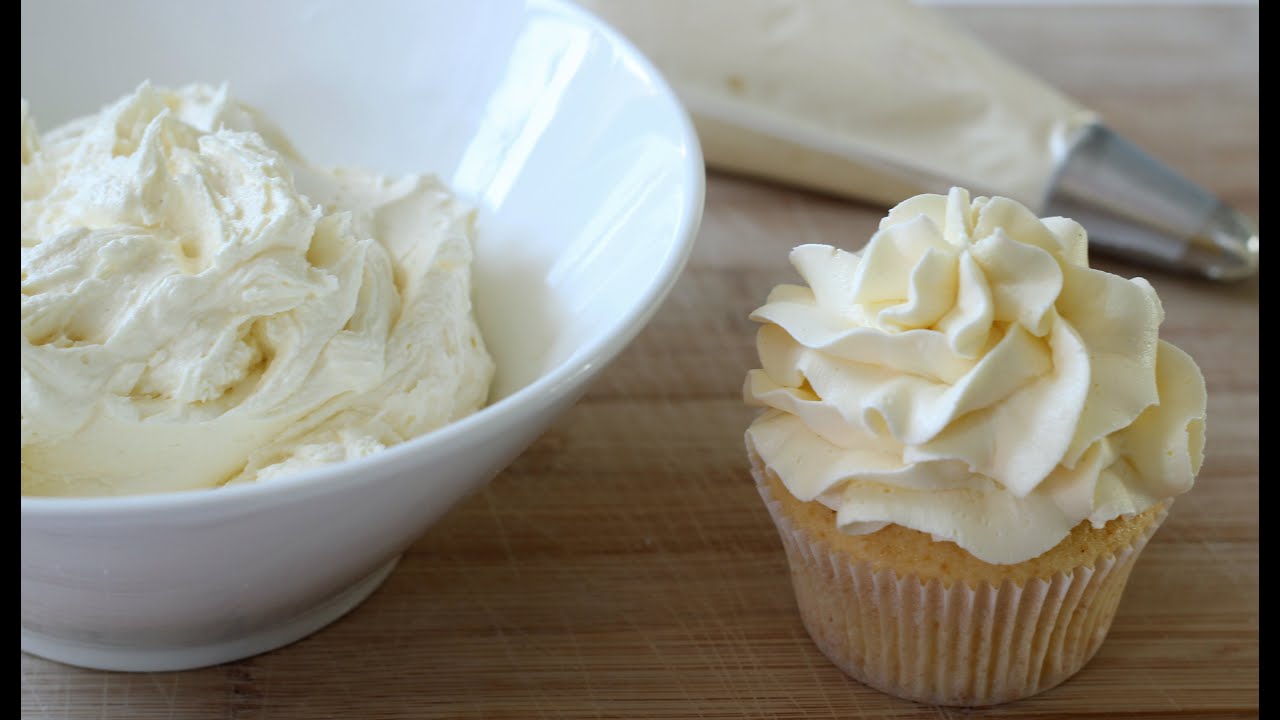
Today I'm sharing with you how to make perfect buttercream Icing. Buttercream frosting is a staple for cupcakes, cakes and many other baked goods.
There are a few tips and tricks that I am going to share with you to get the most perfect buttercream Icing.
Vanilla Cupcake Recipe https://youtu.be/ef3UEhLFyHs
If you would like to see more icing recipes then give this video a like and let me know in the comments down below!
A printable recipe will be linked on my website here http://carinastewart.com/buttercream-recipe/
If you like this video and found it helpful don't forget to thumbs it up and subscribe for more recipe videos! I am always on the lookout for more ideas so if you have any requests please leave me a comment below letting me know what you would like to see.
_ _ _ _ _ _ _ _ _ _ _ _ _ _ _ _ _ _ _ _ _ _ _ _ _ _ _ _ _ _ _ _
EQUIPMENT
Stand Mixer http://amzn.to/1QETAzb
Spatular http://amzn.to/1Ppqzde
Disposable Piping Bag http://amzn.to/1PyVvHc
Wilton 2D Tip http://amzn.to/1PpqBlj
_ _ _ _ _ _ _ _ _ _ _ _ _ _ _ _ _ _ _ _ _ _ _ _ _ _ _ _ _ _ _ _
RECIPE
Enough for 12 Cupcakes
250g / 1 Cup Butter (salted or unsalted)
375g 3 Cups Icing Sugar | Powdered Sugar | Confectioners Sugar
30ml / 2 Tablespoons Milk
Add room temperature butter to a bowl. Beat the butter for 5 minutes until it has become light and airy, doubled in size and lost most of it's colour. Start adding the icing sugar half a cup at a time, beating for about a minute in between each addition. Use the milk to thin out the consistency of the icing, add it a teaspoon at a time. This is also the time to add any flavourings or colourings that you would like. This icing can last in the fridge for a few weeks or the freezer for 3 months. When you are ready to use just let it get back up to room temperature.
_ _ _ _ _ _ _ _ _ _ _ _ _ _ _ _ _ _ _ _ _ _ _ _ _ _ _ _ _ _ _ _
- iHerb http://www.iherb.com/ Use the code PJQ118 for $10 off your first order.
_ _ _ _ _ _ _ _ _ _ _ _ _ _ _ _ _ _ _ _ _ _ _ _ _ _ _ _ _ _ _ _
FOLLOW ME
Twitter - https://twitter.com/carstina
Facebook - https://www.facebook.com/carstinaxx
Instagram - http://instagram.com/carstina
Tumblr - http://carstina.tumblr.com/
Pinterest - http://pinterest.com/carstina/
Email - carstina93@gmail.com
_ _ _ _ _ _ _ _ _ _ _ _ _ _ _ _ _ _ _ _ _ _ _ _ _ _ _ _ _ _ _ _
Camera & Lighting Setup Video - http://youtu.be/p0SWv3OKVes
Camera I use - Canon 600D http://bit.ly/CanonSLR600D
Editing - Final Cut Pro
_ _ _ _ _ _ _ _ _ _ _ _ _ _ _ _ _ _ _ _ _ _ _ _ _ _ _ _ _ _ _ _
Disclaimer - Some of these may be affiliated links.

In this video we experiment with several methods for making ruby in a microwave. Click the link to get $15 off your first pair of BRUNT boots, plus free shipping & returns: http://cen.yt/bruntnighthawk
Thanks to ElementalMaker for inspiring this series of ruby making projects, and also for allowing me to use his footage. Channel here: https://www.youtube.com/user/ElementCollector1001
Thanks also to NileRed for the awesome plasma footage. See his video on the subject here: https://youtu.be/l0u8Vtf2GoQ
Thank you very much to all of my Patreon supporters who have contributed to help me create videos like this one. A special thanks to my top Patrons: Enzo Breda Lee, Jon Hartmann, TheBackyardScientist & Eugene Pakhomov! https://www.patreon.com/NightHawkProjects

#herbalism #herbal #tincture
We have a good bit of herbs to tincture and we are so excited to get this Apothecary rolling!
Wanna See More-
Instagram- @the_honeystead
Website- www.thehoneystead.com
Facebook- The Honeystead
Facebook Group- Honeystead Hangouts
Redditt- The_Honeystead
Pinterest-
https://pin.it/4sycoPp
Wanna Send Us Love-
The Honeystead
PO Box 178
Bentonville, VA 22610
Email Me:
The.honeystead@gmail.com
Our Etsy Store- https://etsy.me/346y2t4
❄️Order your own Freeze Dryer from Harvest Right: https://affiliates.harvestright.com/1243.html
To order your own LEVO II oil infusion machine- https://levooil.com
🌱10% Coupon code- “HONEYSTEAD10”
To order from Hoss Tools and support our channel-
🍅 https://shareasale.com/r.cfm?b=862842&u=2660326&m=65739&urllink=&afftrack=
🌿Medicinal Herbs-Starwest Botanicals - https://shareasale.com/r.cfm?b=140557&u=2660326&m=19017&urllink=&afftrack=
If You Would Like to Support our Channel:
PayPal:
https://paypal.me/honeystead?locale.x=en_US
Shop My Amazon:
https://www.amazon.com/shop/th....e_honeystead?ref=ac_
Wish List:
https://www.amazon.com/hz/wish....list/ls/2W8L3ST9E322
Gear: Canon EOS 80D with Rod mic
Gear: Sony zv-1
Editing App: iMovie
Music from www.epidemicsound.com
Bauds Guan by Dust Follows


https://open.spotify.com/track..../6Tn2HGS0LtXb8i0XuE0
https://www.youtube.com/@DavidRadcliffe333/about
Davidradcliffe2@gmail.com #knockingonheavensdoor on heavens door
#knockinonheavensdoor ' On Heaven's Door" Bob Dylan
Knockin' On Heaven's Door

The full album VELVET, out now! https://empire.lnk.to/adamlambert_VELVET
And get the brand new VELVET merch now: https://us.adamlambert.net
Get tickets to the VELVET tour now: https://adamlambertfans.com/events
Keep up with Adam:
http://facebook.com/adamlambert
http://twitter.com/adamlambert
http://instagram.com/adamlambert
http://adamofficial.com
Footage from the 41st Annual Kennedy Center Honors, Glenn Weiss and Ricky Kirshner, Executive Producers.
For more than 40 years, the Kennedy Center Honors has redefined America's perception of its artistic legacy and reinvented the way this nation rewards its artists. The Honors have been compared to a knighthood in Britain, or the French Legion of Honor--the quintessential reward for a lifetime's endeavor.
Watch more great performances from the Kennedy Center Honors: https://bit.ly/2NwImCn
Subscribe to The Kennedy Center! http://bit.ly/2gNFrtb


Cher and Raquel Welch singing 'I'm A Woman' in the second episode of 'The Cher Show' broadcast on February 16, 1975.
Full playlist: https://www.youtube.com/playli....st?list=PLi6KseJJbch
Subscribe: https://bit.ly/3g0NXBm
Follow Cher:
Twitter: https://twitter.com/cher
Facebook: https://www.facebook.com/cher
Instagram: http://instagram.com/cher
https://www.cher.com/
#Cher #CherShow #raquelwelch

Jack (Sean Hayes) meets the real Cher while out to lunch with his Cher doll. Unconvinced it's actually her, they have a Cher-off.
Episode Highlight: "Gypsies, Tramps and Weed" Season 3, Episode 7
» Subscribe for More: https://www.youtube.com/channe....l/UCLem9J0NkphqGbIYX
» Stream Anytime: http://www.nbc.com/will-and-grace/episodes
WILL & GRACE ON SOCIAL:
Like Will & Grace on Facebook: https://www.facebook.com/nbcwillandgrace/
Follow Will & Grace on Twitter: https://twitter.com/willandgrace
Follow Will & Grace on Instagram: https://www.instagram.com/nbcwillandgrace/
Find Will & Grace trailers, full episode highlights, previews, promos, clips, and digital exclusives here.
NBC ON SOCIAL:
NBC YouTube: http://www.youtube.com/nbc
Like NBC: http://Facebook.com/NBC
Follow NBC: http://Twitter.com/NBC
NBC Pinterest: http://Pinterest.com/NBCtv/
NBC Instagram: http://instagram.com/nbc
ABOUT WILL & GRACE
That's right, honey! A decade after their unforgettable eight-season run, comedy's most fabulous foursome is back. Debra Messing, Eric McCormack, Sean Hayes and Megan Mullally reprise their celebrated roles as Will, Grace, Jack and Karen. The 11th and final season of Will & Grace will feature 18 episodes. Behold once again, from the minds of Max Mutchnick and David Kohan, TV's wittiest ensemble ever. The legendary James Burrows, director of every original Will & Grace episode, has returned with a slew of razor-sharp jabs and dirty martinis. Will & Grace stands as NBC's most watched comedy in seven years. Originally debuting in 1998, Will & Grace has been nominated for 91 Emmy Awards, winning 18 of them, including Outstanding Comedy Series. The series has also earned seven SAG Awards and the show is one of the few in TV history where each member of the cast has won an Emmy.
Jack Meets Cher - Will & Grace
https://youtu.be/mfqC28HcNjk
Will & Grace
https://www.youtube.com/WillandGrace
Google Play, Just Watch & iTunes links
https://play.google.com/store/tv/show/Will_Grace?id=NhiqWDfkmbrmj1fLIJpicA&hl=en_US&gl=US
https://www.justwatch.com/uk/t....v-series/will-and-gr
https://itunes.apple.com/gb/tv....-season/will-grace-s

